Today we drove to eastern city of Lappeenranta by the Russian border where our oldest son has been studying for the past five years. He is now finishing up his studies and we are clearing/cleaning his apartment.
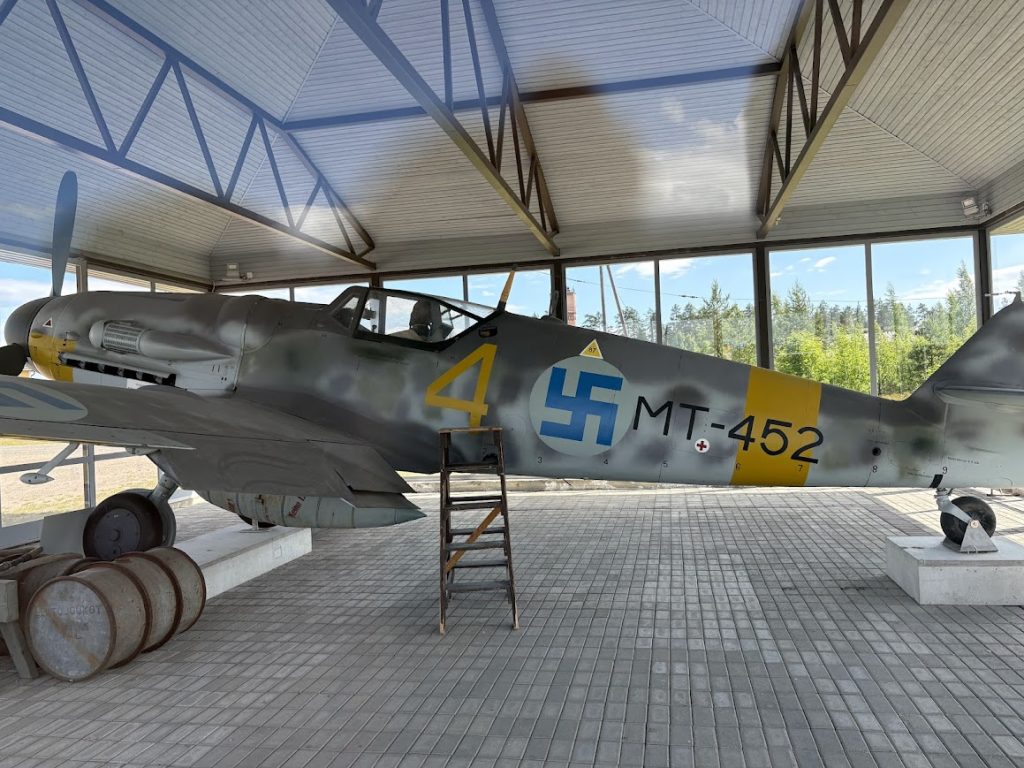
On the way – at Utti – there is a Messerschmitt Bf 109G-6 on display. It’s the MT-452. Utti is a small town close to “the most Soviet-looking city” in Finland – Kouvola. The Messerschmitt is such a cool-looking aircraft, and one of the most produced planes ever! “Sadly”, the day was very sunny, so it was difficult to take a good photo of the plane due to the glare. The area is a military zone but it is allowed to visit the plane and other memorials close to it.
MT-452 has nine kills by three different pilots and they all seem to be either IL-2s or La-5s.
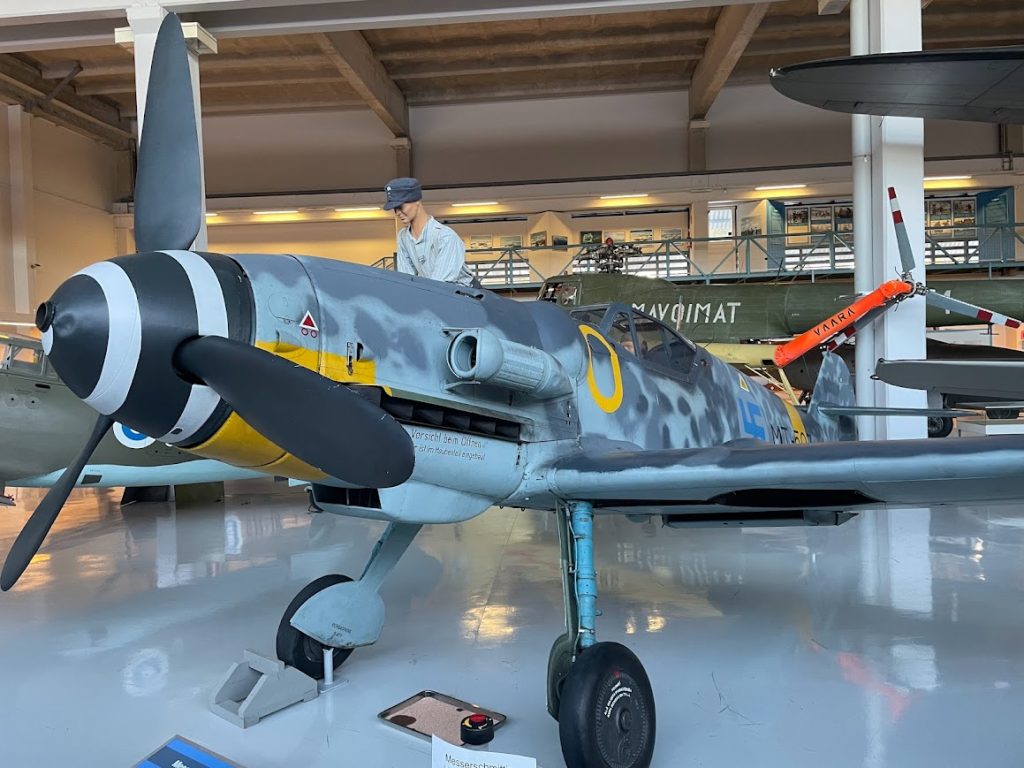
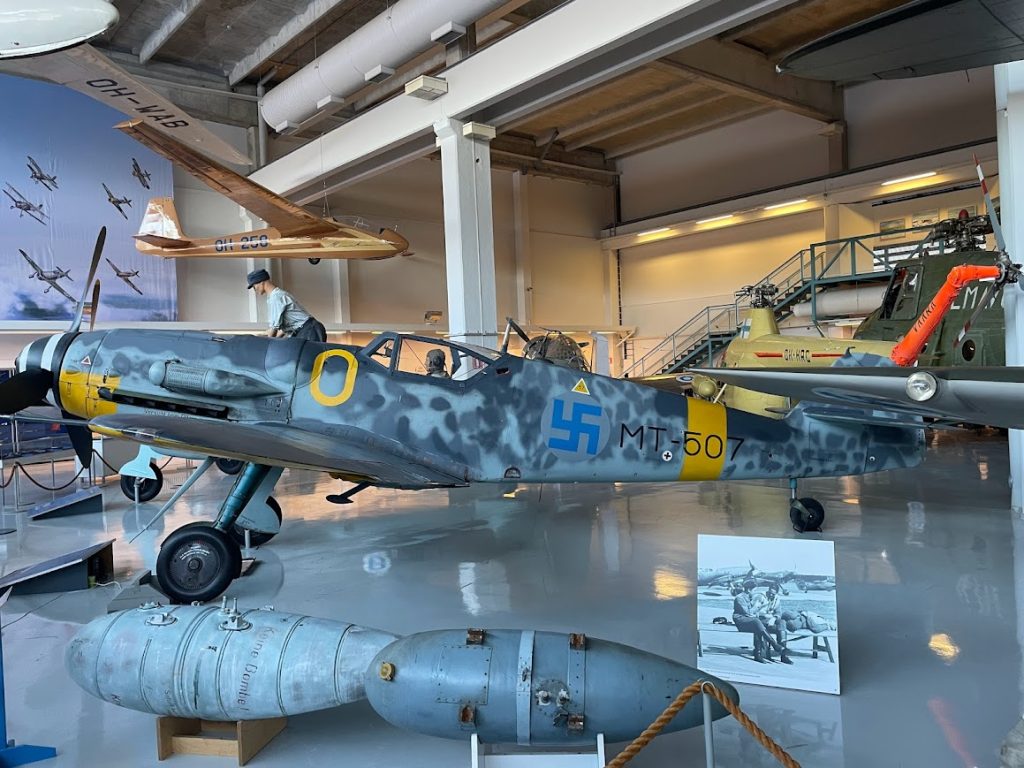
Now, the interesting part is that MT-507 was the last Me 109 flown in Finland and the last flight was done by Lt. Col. Erkki Heinilä who was the husband of my wife’s great aunt! So, a small connection there 🙂 MT-507 was originally located at Utti after the last flight in 1954, but was later relocated and MT-452 took its place in 1970.
Below are a few photos I found of the MT-507 which I took at the Finnish Air Force Museum at Tikkakoski close to Jyväskylä. One of my sons tried to get in to the air force, but failed. I had no idea the Me 109 was flown by my wife’s relative!
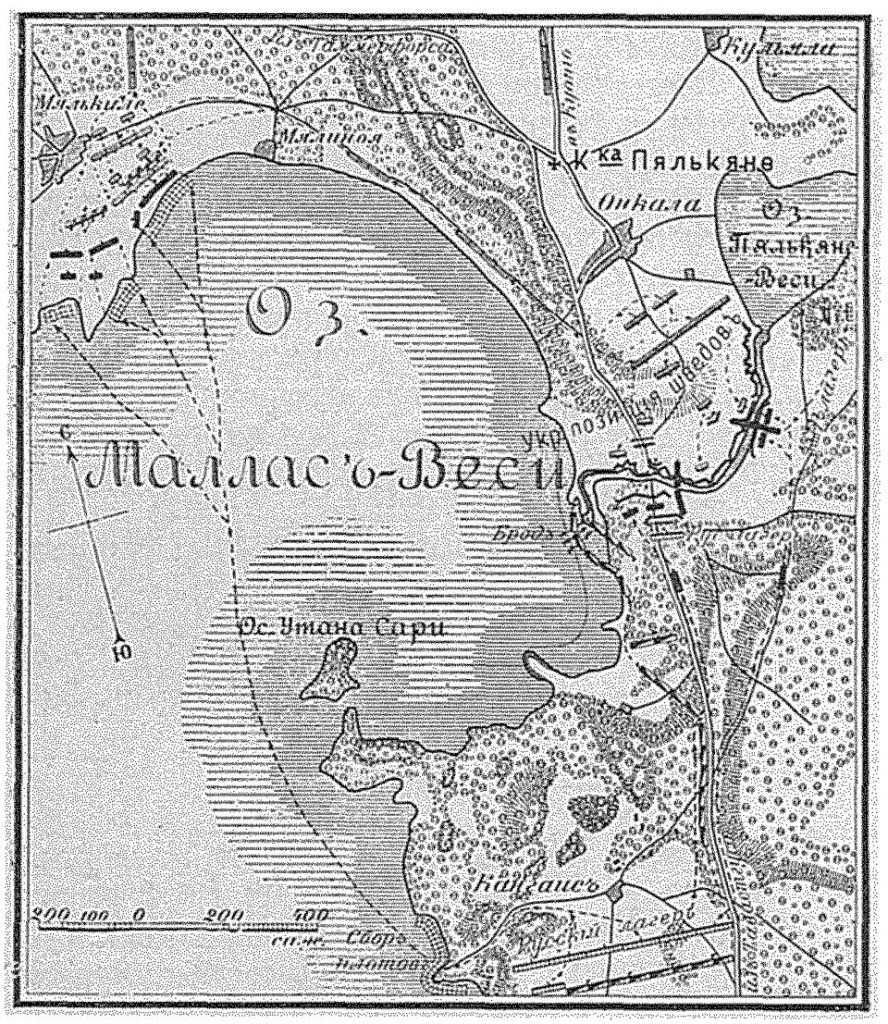
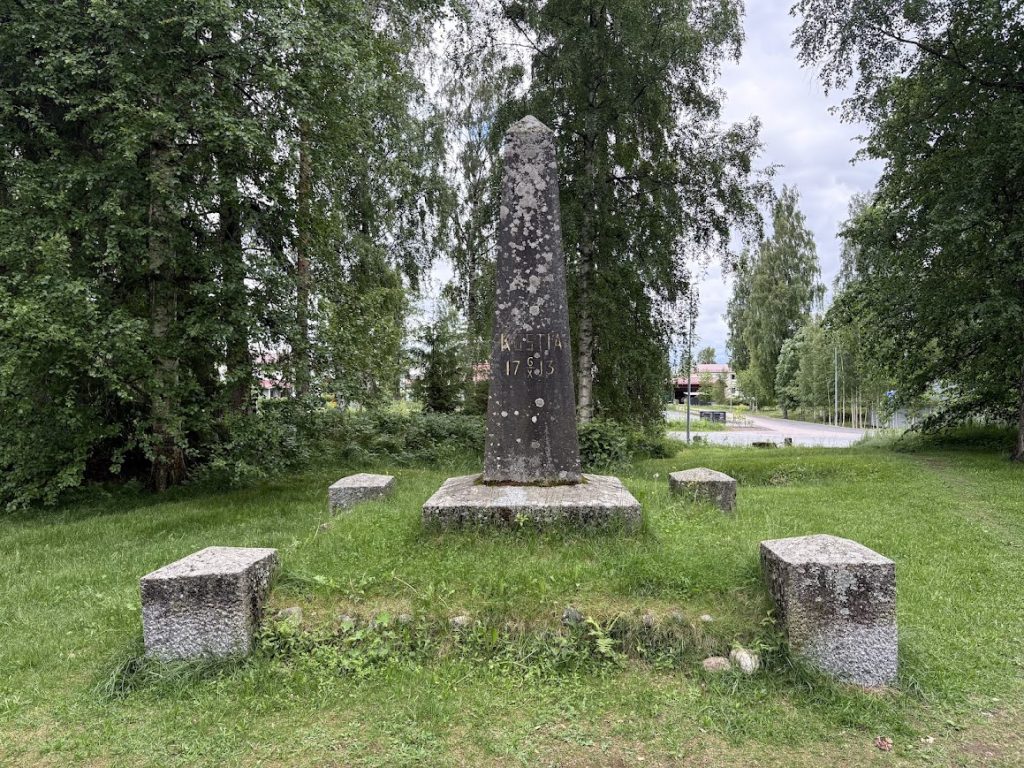
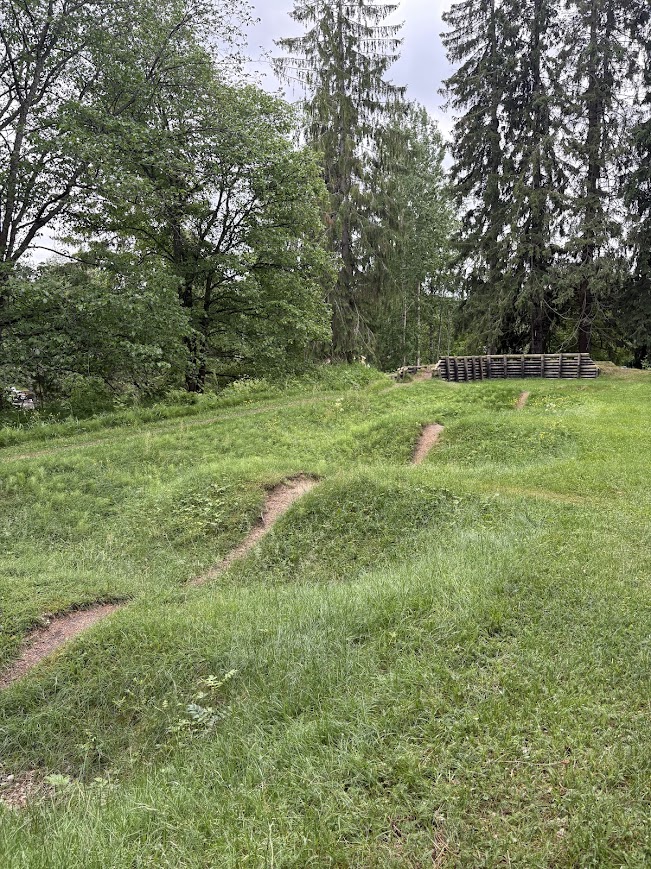
To better cope with the cold weather, I took a road trip to see the Kostia stream (Kostianvirta) at Pälkäne, near the city of Tampere. Kostia was a major natural obstacle where the Swedish army set up their defenses during the last stages of Great Northern War in Finland, in the Fall of 1713.
Kostianvirta split the narrow isthmus – it’s about a mile long and is mostly not fordable, although the southern side is relatively shallow. Admiral Fyodor Apraksin led the Russian force of some 15.000 men that was moving north driving the remaining Swedish army away from the important southern coast. The Swedish army was led by General Armfeldt and he had deployed about 3.500 men to protect the northern shore of the stream.
The details of the battle are summarized on the Wikipedia page, so I will not repeat them here. I wanted to see the location with my own eyes as we are designing a game that covers this battle.
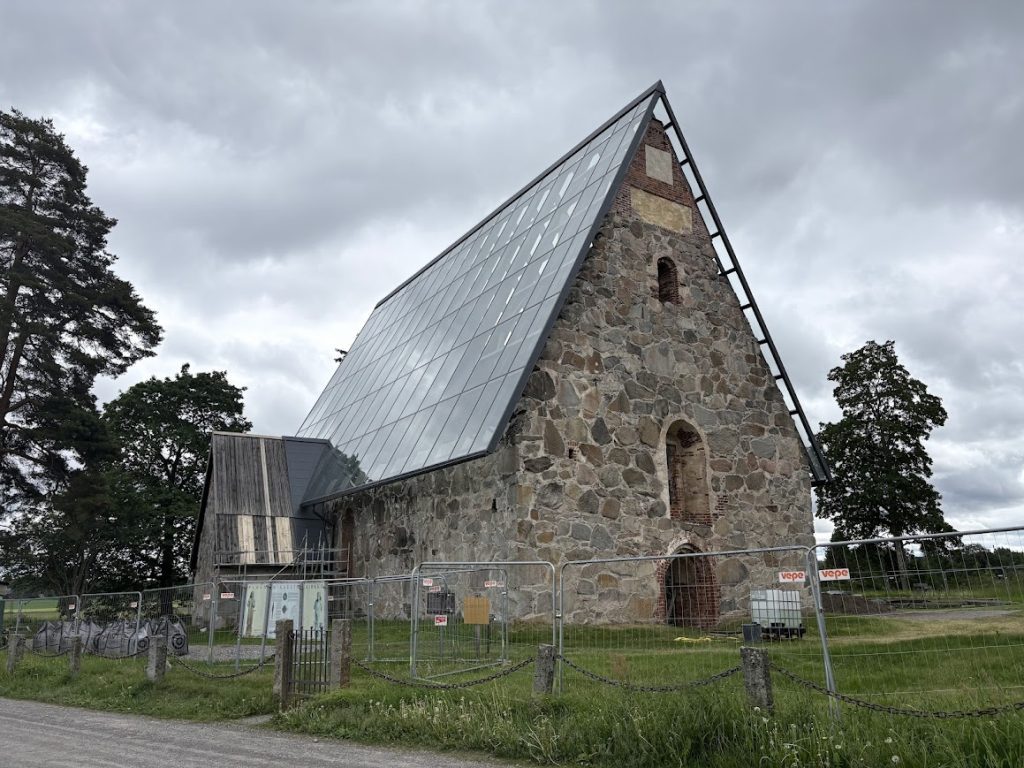
I first headed over to the historical Pälkäne Ruined Church as it has been there since about 1495-1505. Only the walls remain and it has now been covered by pretty cool-looking glass roof.
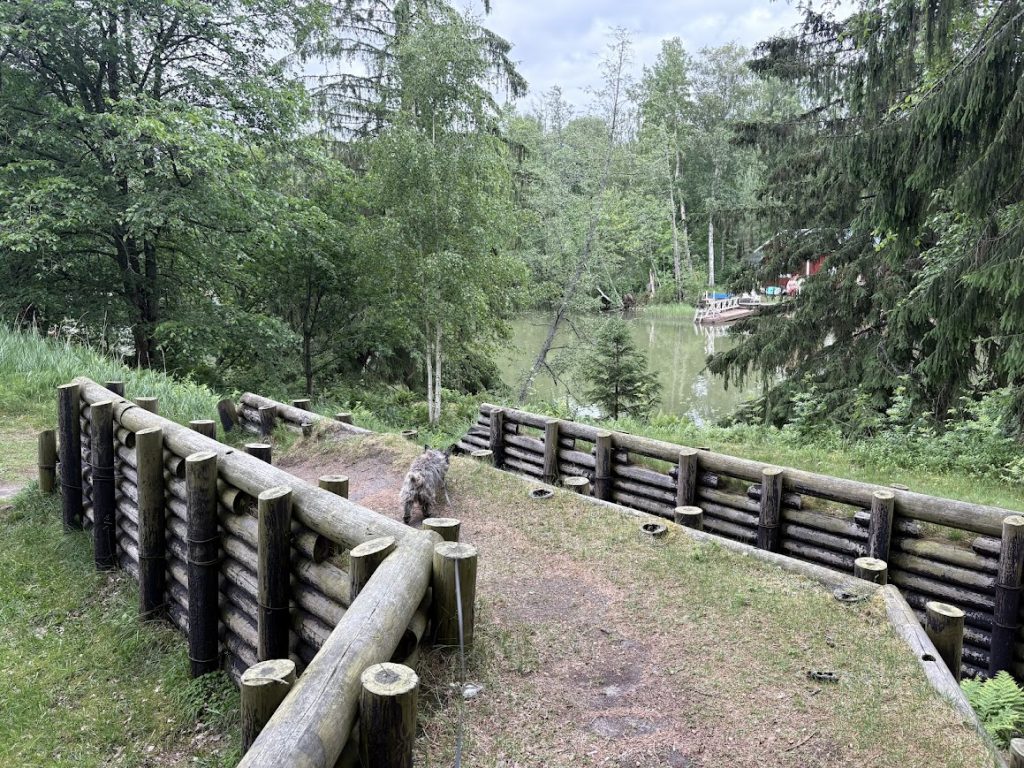
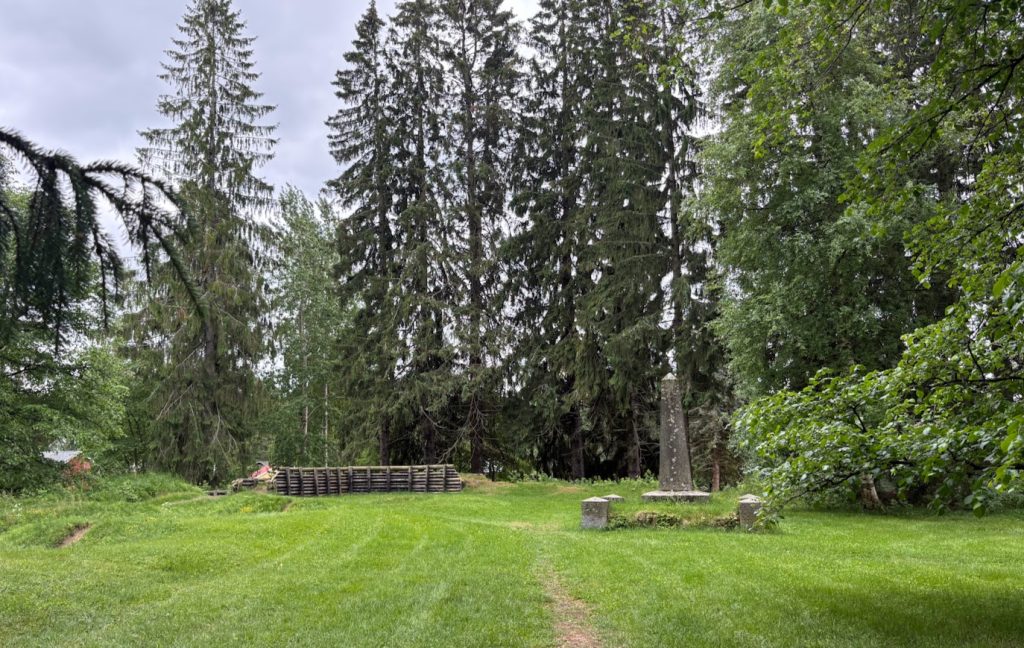
After taking my pictures and a quick walk, I continued to Kostia Fortress located at one of key sites of the fierce fighting that took place in early October, 1713. I think the fortress is just a fancy name given to the historical landmark commemorating the battle and a very nice reconstruction of the Swedish defensive works. They had built a layered timber breastwork along the key locations of the stream. These were sloped towards the water allowing the troops above to fire over their comrades.
Unfortunately, the memorial is not in a good shape at all.
What appears to be part of the original position has been repurposed by the locals.
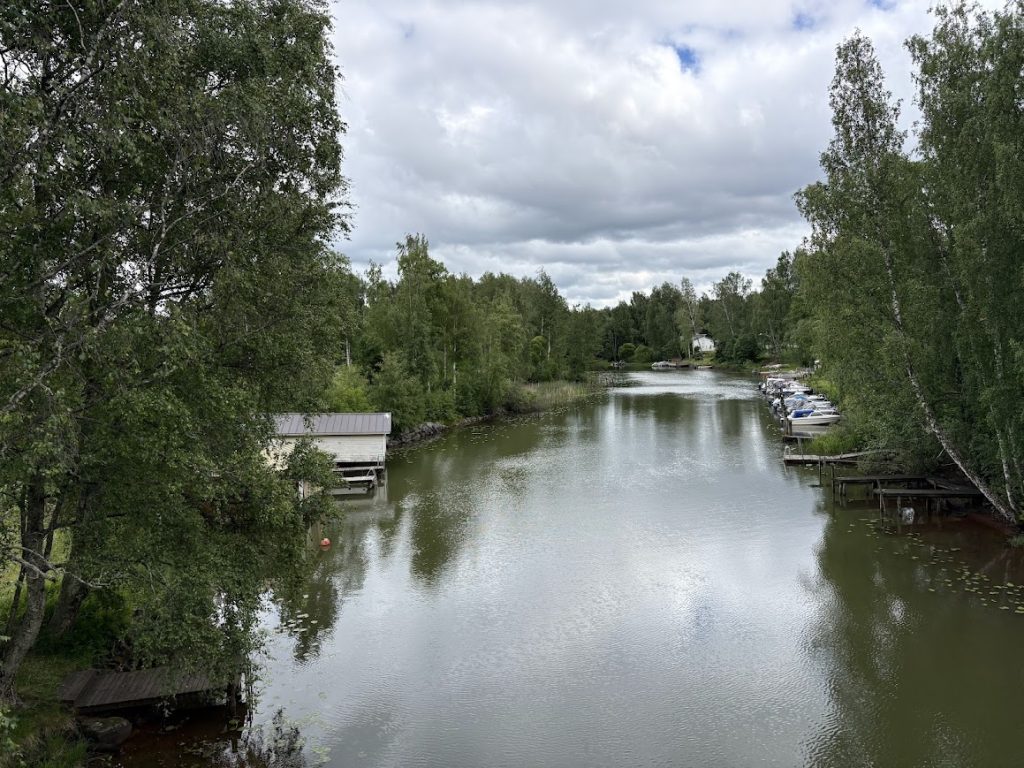
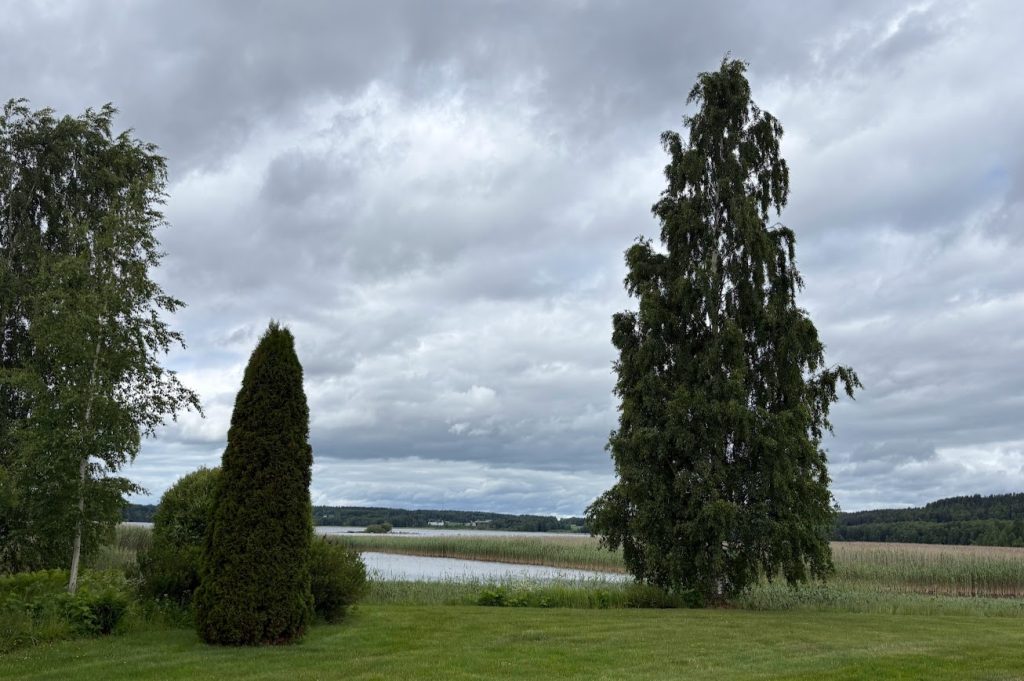
I strolled towards the area where the stream merges into the lake, but it was private property. The Russian cavalry tried to wade around the small point where the lake wasn’t too deep, but obstacles had been built there. I ended up stopping at a few locations to check out the scenery and was rather surprised to see how high the hills where on the southern side, where Russian artillery was positioned.
Kostia stream today – it was big enough to block a direct frontal assault although it was fordable at a few locations.
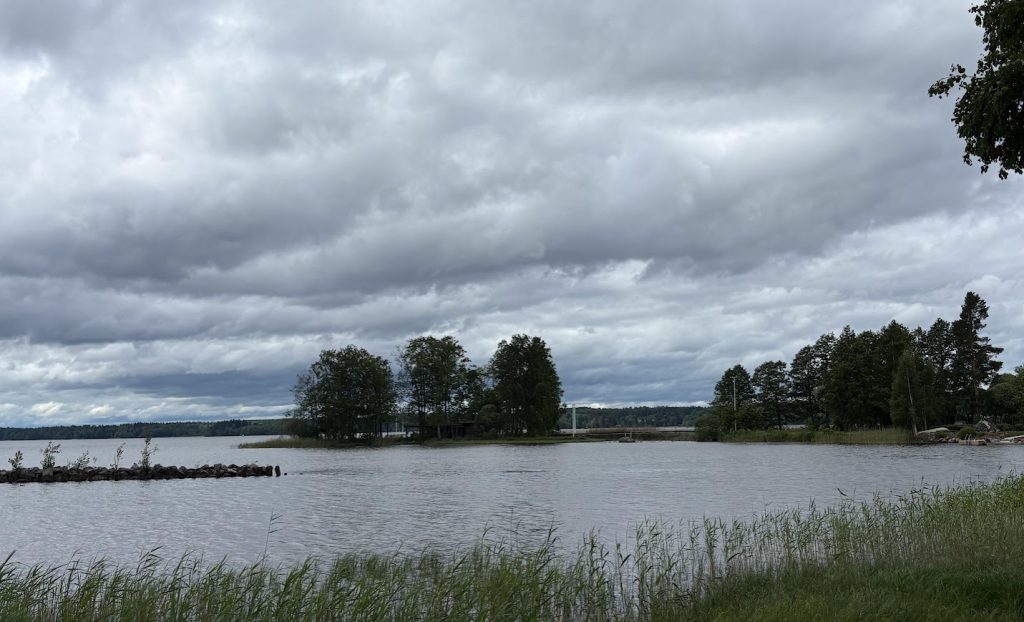
This part of the lake is very shallow.
View towards Mälkilä where the Russians landed bypassing the defensive line.
The night of July 7th was quite peaceful; both sides were regrouping after a day of heavy fighting. The French filled the gaps in their defensive line but remained steadfast, determined to stand and fight. They believed they were strong enough to wear the British down and eventually force them to admit defeat and retreat down the lake to the ruins of Fort William Henry.
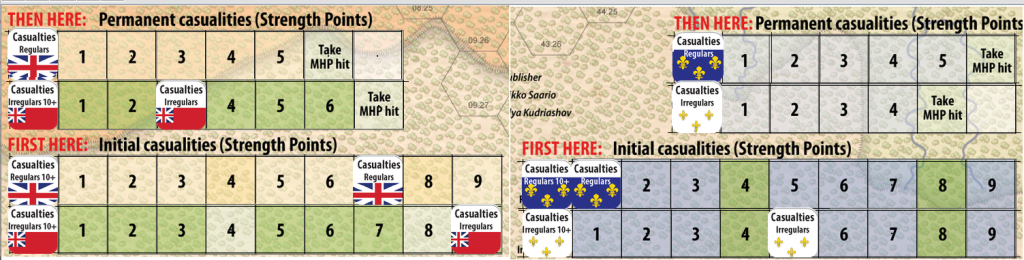
Maintenance Segment
A new day begins with the Maintenance Segment, where replacements and other recovery actions are resolved. During this phase, one out of every four losses is returned to the fight.
In the image above, the British regulars have suffered a total of 7 SP of initial losses. Losses are always reduced in groups of four: three SP are transferred to Permanent Losses, and one SP is returned as a replacement.
The irregulars have suffered 9 Strength Points (SP) of losses. These are reduced in two groups of four: 6 SP are moved to Permanent Losses, and 2 SP are returned to the battlefield as replacements. Both replacement SP are allocated to the NJ Regiment. The last 1 SP remains on the track.
Note that these are Strength Points, and a single replacement step may require either 1 or 2 SP, depending on the unit’s size.
French irregulars regain 1 SP.
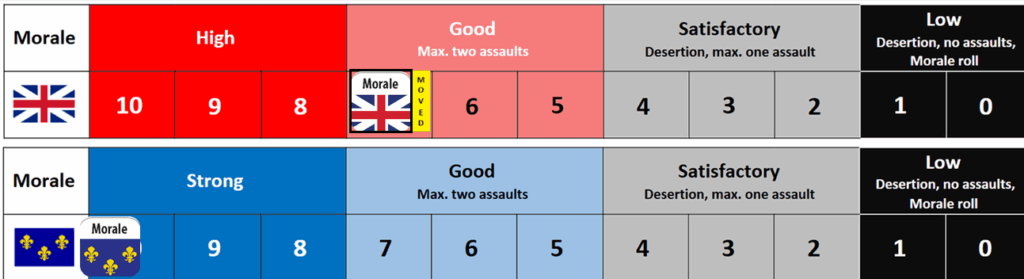
Due to insufficient supplies landing, the British lose 2 Morale points. However, 1 Morale point is recovered through the “Improve Morale” action, which increases morale by one step each day.
The British decide to commit to one assault, deducting 1 additional Morale point.
Morning Action Segment
The main French force consolidates its line and prepares to continue fighting. During the quiet night, some French units built or improved breastworks (an easy detail to forget in solo play).
A small French Indian unit, which had previously failed to achieve success against shaken British forces, was able to regroup. Instead of withdrawing off the map (which would not incur a penalty), it force-marched through the morning mist across the hills toward the British landing area, hoping to surprise lightly protected artillery and supply units. However, on their own turn, Provincial troops moved into position and secured the area before the French could reach their target.
Artillery fire
Before infantry combat, artillery fire is resolved for both sides.
I started with the French artillery facing Lord Howe’s troops (“Fiedmont” above). Rolled a zero for the French – an immediate and total failure.
Then rolled for the heavy cannons three hexes way – TWO zeros for the French in a row! A complete artillery disaster!
The British artillery takes its turn next. Captured French 18-pounders blast away against their previous owners – the same French artillery battery that just fired. Vassal is playing Jedi mind tricks – I rolled a 9 twice in a row for the British reducing the fortification.
As the fighting resumed, a British Artillery Castle advanced. On its first attempt, the French artillery missed at short range, but a second battery scored a hit and forced the vessel to withdraw.
I also brought in the second British Artillery Castle, which managed to push forward against the French position. By accident, it had mortars onboard—I had been using the old counter image, and after updating it, I realized I had intended to equip it with howitzers instead. Nevertheless, the mortars performed well, successfully targeting the heavier French guns further away (mortars cannot fire into adjacent hexes).
The third die roll, required to randomly determine which unit in the hex was hit by indirect fire, resulted in an eight. This inflicted a step loss on the 18-pounders, reducing them from four to two pieces. The Artillery Castle then withdrew behind the British lines.
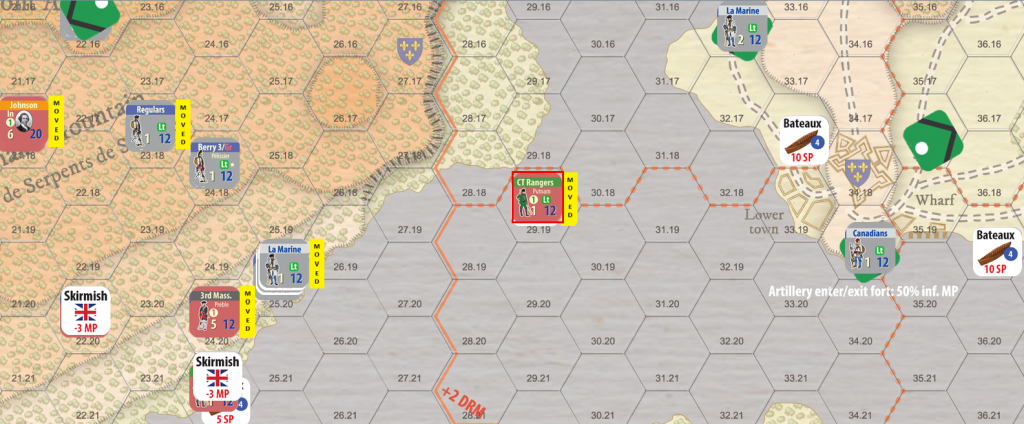
Incursion
The British then made use of captured French bateaux left on the shore of Lake Champlain. The 55th Regiment, led by Putnam’s Rangers, quickly boarded the boats and sped toward the French artillery position guarding the mouth of the river.
Because of their approach vector and the ample availability of supporting guns, the cannons at Lotbinière’s Battery fired at long range, with only a 10% chance to hit. They missed, and the cannonballs splashed harmlessly into the water around the speeding bateaux.
The light infantry continued rowing closer to the artillery position, keeping a safe distance from Fort Carillon and its heavy artillery. Four hexes was the closest range at which the fort’s guns could fire. Two nearby 12-pounders also fired but missed. However, the four 18-pounders from Carillon did not miss, even without the +2 to-hit DRM bonus. A second successful roll scored a hit, aborting the aggressive maneuver.
Main action
After the artillery action and the light infantry’s incursion, “the main action” begins. I’ll start from the top of the map.
Langy’s Canadians lost the engagement but there were no losses on either side – they pulled back and the British did not advance.
Howe’s attack against the 500 Canadians guarding the artillery was successful. After losing one SP, the French had to retreat and leave the remaining cannons behind. Finally, the road is starting to open up towards the portage road.
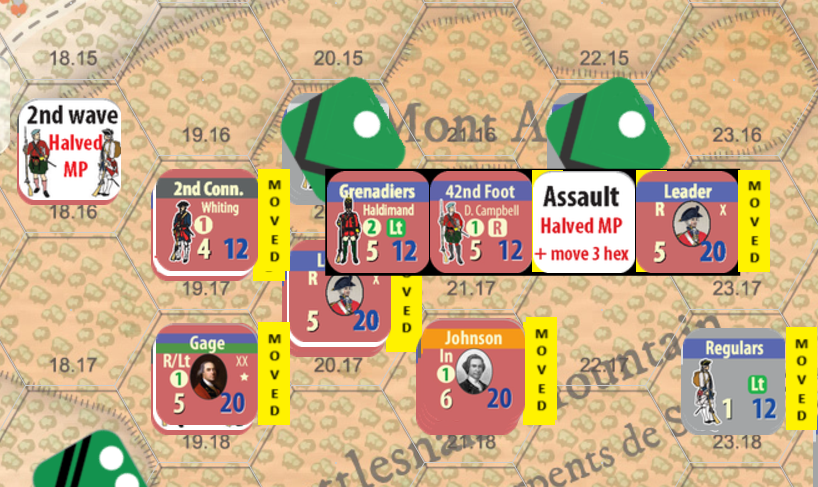
Assault
I decided to storm the French hill position on Mont Agne (or whatever it was called at the time) with my one committed British assault. I assigned the replacement leader to the mandatory regulars-only stack, but kept Gage in the background to lead the assault.
Let’s do the math:
– Two assaulting stacks: one with 10 SP, another with 8 SP – Provincials are halved in assaults – 5 SP defending
This gives 3:1 odds (I aimed for 4:1 but didn’t have enough regulars available). The breastworks reduce this to 2:1. These odds apply to both attacking stacks, which are resolved separately. Essentially, both attacking stack utilize the better odds, but only the one of them (the “main” regular infantry stack) is included in the combat results. The second stack will roll for own casualties only.
The lead assault group (the one with the regular leader) attacks first: – Uphill: –1 DRM – Haldimand’s grenadiers: +2 DRM – Gage: +1 DRM (the assault leader himself has no bonus, but Gage is within range and provides his modifier)
Total modifier: +2 DRM, as the defending stack has no modifiers.
This is the decisive roll for the entire assault.
The die roll was 3, modified to 5 — a narrow success.
The second stack rolls only for its own losses; the defender’s result is ignored. The roll was 1, modified to 3, resulting in one step loss, which I allocated to the provincial regiment.
The final action occurred by the lake. Regulars and provincials attacked a reinforced French stack at 3:2 odds with a –1 DRM. This did not go well for the British. They suffered one step loss — again assigned to the provincials. The stack retreated and became disrupted.
This concludes the combat phase. No adjacent hostile units remain..
Of course, I realized afterward that I had forgotten to use my British Light Artillery. In an effort to streamline play, I replaced on-map artillery counters with off-map markers that provide a +1 DRM in offense (–1 in defense). I simply forgot to apply the modifier.
Finally, I conducted end-of-segment cleanup: removing disruption markers (for both sides), clearing Used and Assaulted counters, and resetting the board for the next phase.
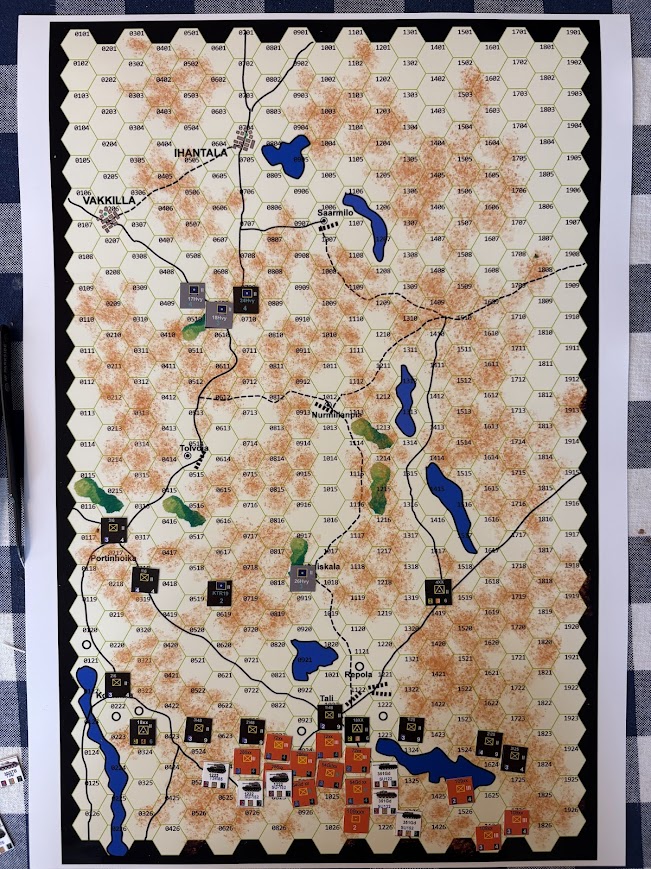
I recently spent some time testing Perry Moore’s new game Kursk in Finland. The game depicts the decisive battles between the Soviet Union and Finland in the summer of 1944. Tali-Ihantala refers to two towns in what was then Finland—now part of Russia—where the mighty Red Army was repulsed and Finland effectively preserved its independence.
The Soviet summer offensive of 1944—Operation Bagration—was a decisive blow against the German Army Group Center. Some weeks before Bagration began, the Soviet Union launched the Vyborg–Petrozavodsk Offensive against Finland, aiming to force Finland out of the war. Three Soviet armies attacked on the Karelian Isthmus, while two more advanced into eastern Karelia.
With overwhelming firepower, the Red Army pushed forward and ultimately captured Finland’s second-largest city, Vyborg (Viipuri). (Side note: my mother was born there.) Facing this powerful enemy, Finland requested support from Germany. Some limited—but crucial—assistance arrived: Panzerfausts and Panzerschrecks, Detachment Kuhlmey (Ju-87s and Fw-190s), an infantry division, and a half-strength assault gun brigade. Not much in the context of this enormous struggle, but just enough to stiffen the defense. Even so, the Soviets outnumbered their opponents by roughly 20:1 in aircraft and armor.
The game begins as the Soviets continue their offensive after taking Vyborg. The town of Tali lies directly in their path. The Finnish army in the area consisted mostly of regular infantry, while the Armored Division was deployed in an adjacent sector.
Rough starting locations on the standard map.
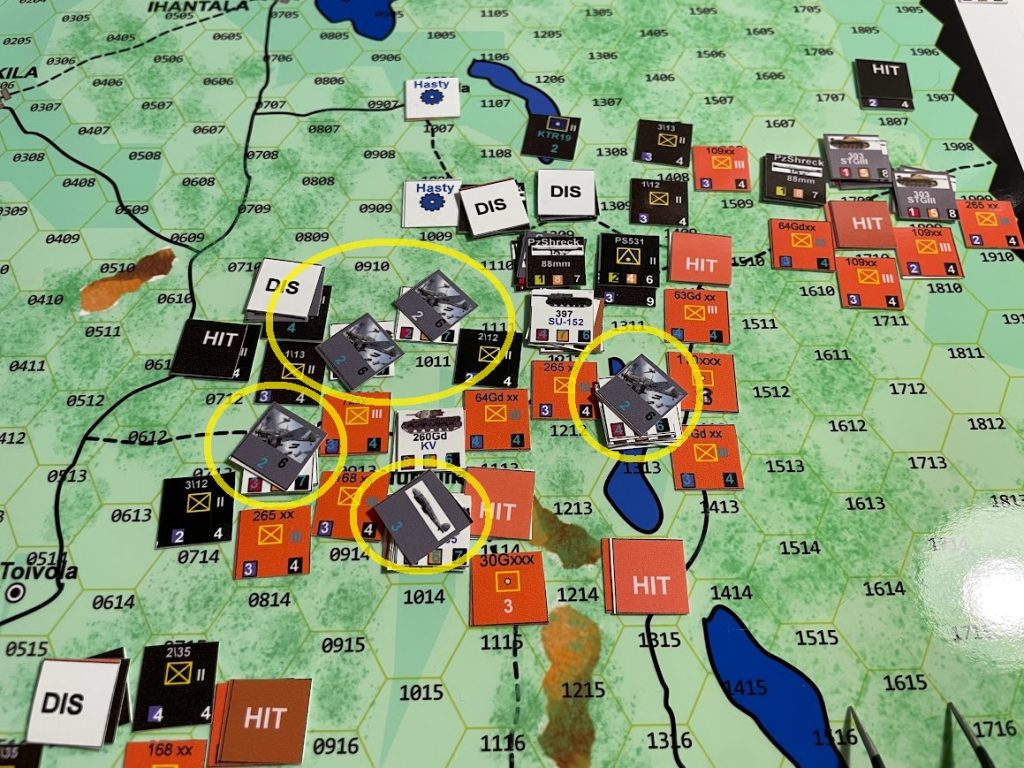
As a print-and-play game, the quality of the map and counters is largely up to the player. I didn’t spend too much time on production quality—as you may notice—particularly on the counters. They’re printed on glossy photo paper on one side and adhesive paper on the other. Good enough for testing purposes.
I won’t dwell too much on the “test” aspect, and will focus more on the game itself. Historically, the Soviet onslaught was halted through massed artillery fire and aerial bombardments that crushed concentrated Soviet armor and infantry. The same holds true in the game: these are the decisive factors. Infantry feels somewhat fragile and slow, and the fine line between victory and defeat depends on the effective use of heavy assets.
The Finns historically concentrated more than half of all available artillery in the entire army to counter the Soviet attack. Batteries from multiple divisions, supported by corps-level heavy artillery, concentrated their fire on single points—often obliterating enemy units before they could even advance. In the game, if you gain air superiority, you can bombard any hex on the map. Artillery, however, requires spotting, so many tempting targets remain untouchable.
Concentrated air support can bring heavy firepower to any hex on the map. In this rare moment, Det. Kuhlmey delivers lethal packages.NOTE: I have edited the map file to make it… greener.
Artillery is the king of the battlefield—especially in this game. It will frustrate the Soviet advance time and time again.
The game system uses a fairly standard IGOUGO structure, with clearly defined segments for bombardment, prepared attacks, and movement + mobile attacks. Zones of Control behave as expected, and a disrupted unit loses its ZoC, allowing the enemy to bypass it easily. Due to their heavy armor, the Soviet player is largely constrained to road networks, while the Finnish player aims to block those roads, bypass strongpoints, and encircle powerful enemy concentrations.
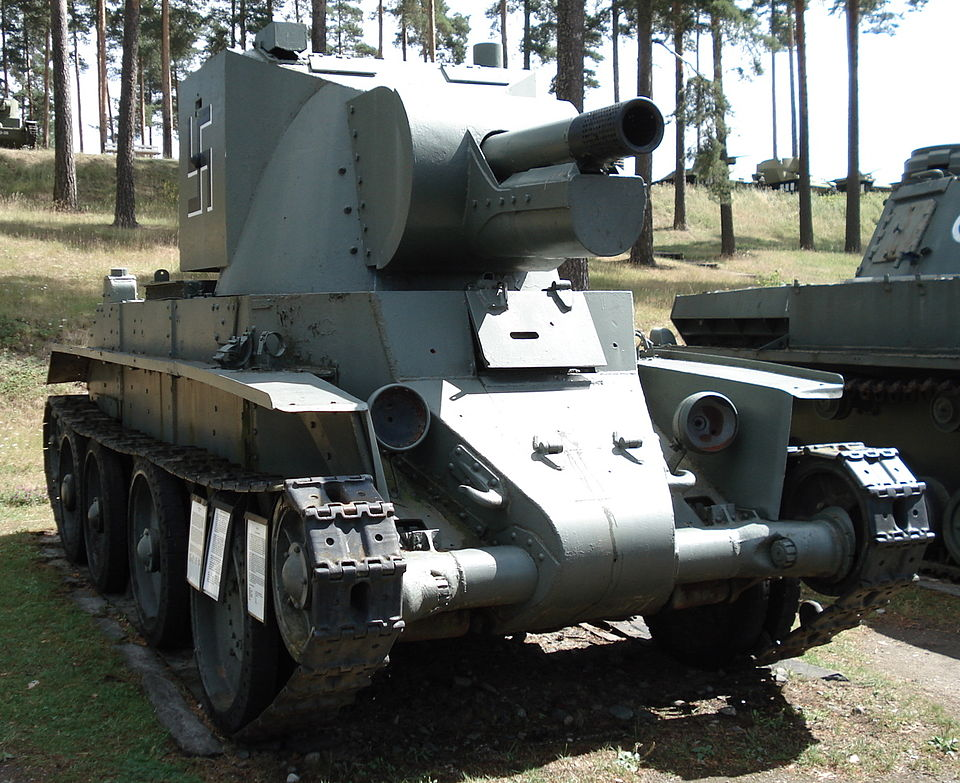
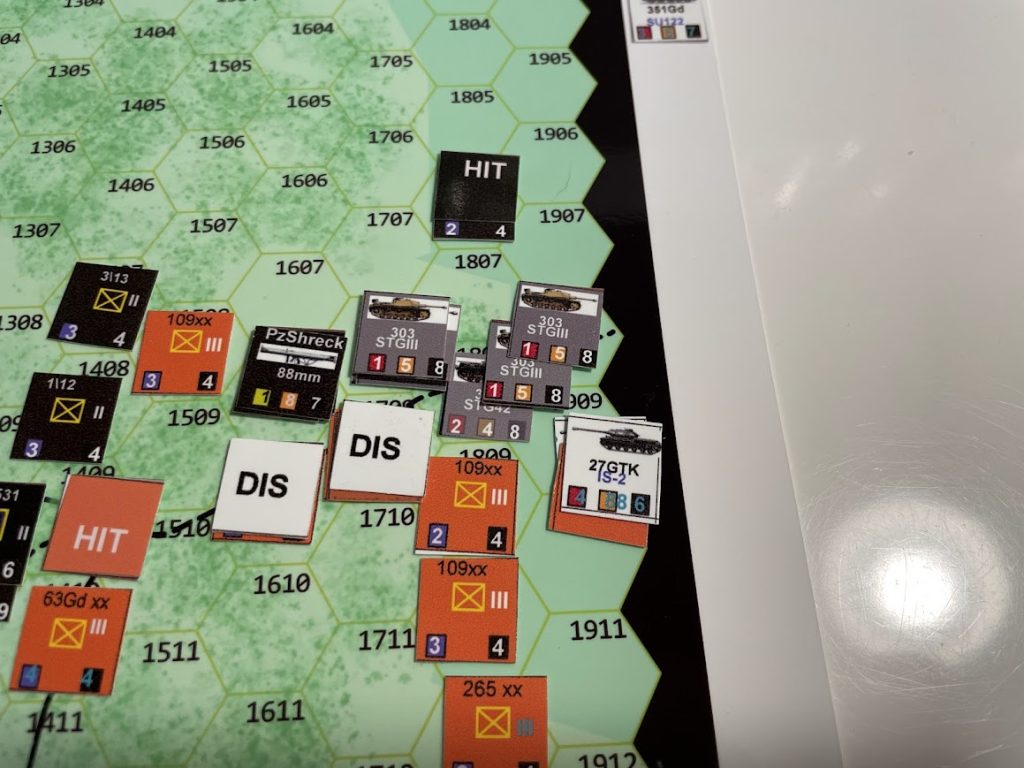
Most of the map is forested, which restricts movement. There is randomness in both artillery and air support availability, as well as in combat results. Heavy IS-2 tanks and SU-152 assault guns are formidable Soviet assets. The Finns receive Panzerschrecks and StuG III assault guns as reinforcements. Even the tiny T-26 tanks and BT-42 assault guns are useful—they’re fast and project a Zone of Control. Panzerschreck teams can also be repositioned to stop or delay breakthroughs.
While it’s possible to create defensive stacks that are immune to direct attack, they can still be bombarded into retreat and disrupted, causing them to lose their ZoC. Artillery and air support levels vary from turn to turn: air support is randomized every time, while artillery may receive additional ammunition if the Dice God is favorable.
The Finnish player must initially delay the Soviet advance as effectively as possible. As always, this is a balance between preserving strength and conceding ground. Once the Finnish counterattack begins, the roles partially reverse—not completely, but enough for the Soviets to start feeling the pressure. A change in initiative can even result in a double turn.
Blocking the Soviet advance. There may be a race to get some units to exit the map for a quick victory.Green is not the standard map color.
The Soviet player wins either by exiting enough units off the map or by having more victory points at the end of the game. Victory points are awarded for capturing villages and towns, as well as for destroying enemy units. Neither path is easy. Because the defender allocates hits, losses can be spread across units in large stacks. I usually played with a house rule to mitigate this, though that was purely a personal choice. For the Finns, success depends on holding as many locations as possible while steadily inflicting casualties on the Soviet forces.
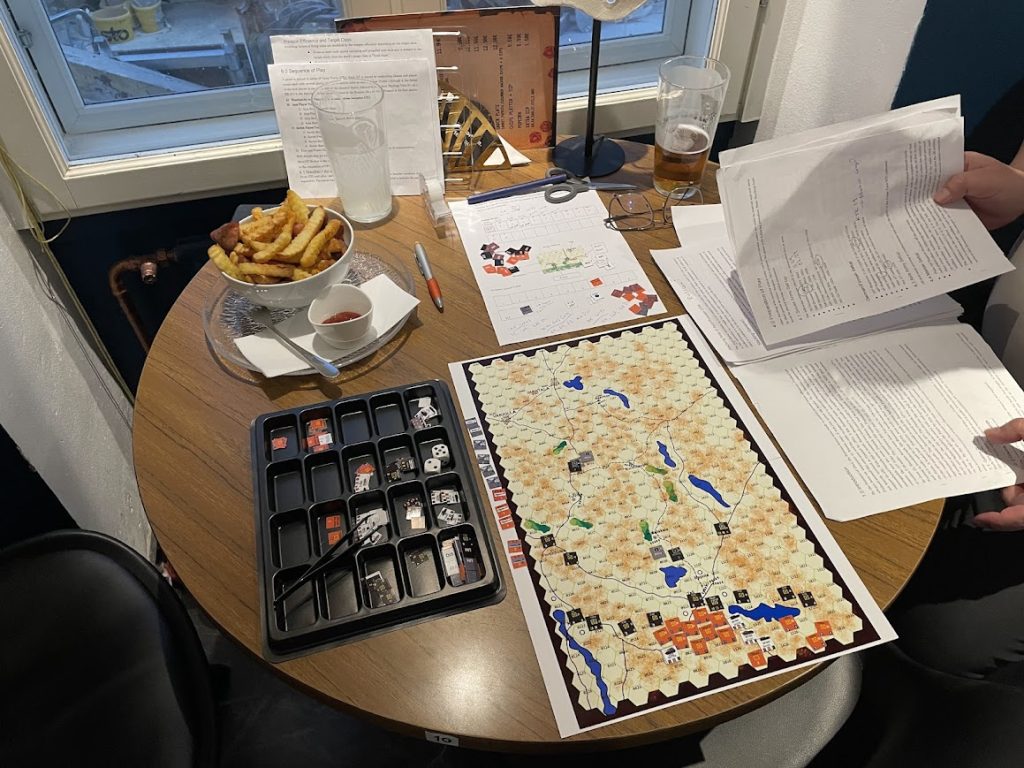
The map is quite compact. Unfortunately, the fries are not included.
A typical session lasted around 4–6 hours for me. I never quite reached the 2-hour playtime that some other testers reported—maybe that’s just me. In any case, you should be able to complete a full game in an evening and still clear the table for something else afterward.
Going into the afternoon phase, I don’t feel the British are in a particularly strong position. Their troops are spread thin, although the breakthrough in the line is exploitable. There was no French counter-attack, as only a few powerful units were in the vicinity and the French chose not to risk losing them in a potentially failed assault. British success here might force the French to act—perhaps even pulling completely out of the fortified line. That would be total chaos.
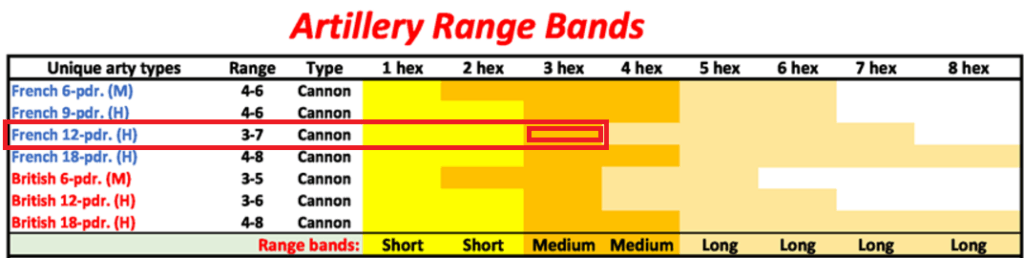
As a brief refresher on the artillery mechanism: during the defensive artillery fire segment, four French 12-pounders bombarded the British on the opposite side of the lake. The initial roll was a 6 (+1), resulting in a “hit,” but the subsequent impact roll was a 0, causing no effect.
The French 12-pounders were three hexes away, placing them at medium range.
With four guns firing at medium range and an artillery leader providing a bonus, scoring a hit was fairly comfortable. However, the impact roll failed. A few men were wounded and some horses bolted, but in game terms it simply wasn’t enough to matter.
The few British units stranded on the “wrong” (western) side of the lake, facing the main French line, maintained a strong presence to deter the French from shifting troops to the eastern shore. Meanwhile, all available British units continued pouring through the gap in the line.
Starting combat from the bottom of the screen, the 3rd Connecticut brushed aside the demoralized Indian units, killing 100 of them. The next French group pulled back in a skirmish retreat. After a “small rearrangement” of British and Provincial units, I attacked the 300 men holding the line behind the fortifications. They were forced back, and no additional casualties were suffered by either side.
A risky uphill attack against troops holding Mont Agné went poorly. After losing 100 Massachusetts troops, the demoralized survivors were forced to pull back.
An Artillery Castle attempted to push forward along the lakeshore to provide support, but French 12-pounders interdicted the move and forced it back. Though rattled by cannon fire, the wooden armor prevented any serious damage. On land, Lord Howe arrived to lead the 44th in an attack against the 2nd Battalion of the Berry Regiment, inflicting a 1 SP loss and forcing the French to retreat in disruption. This marked the first loss suffered by the French continental regulars.
The only attack on the western side went disastrously. Despite the leadership of John Stark, British troops lost 300 men without inflicting any losses in return – Langy / de Langis held his line. The British casualties are becoming unbearable.
Continuing the initial breakthrough—very ahistorically—Colonel Gage personally led the grenadiers and went on a remarkable run, clearing French units from their positions. Emboldened by this success, his troops pressed on, sweeping away both a strong 6 SP stack and a weaker force guarding the end of the defensive line.
(After a four-month break from the project, I am now resuming work on it.!)
As the morning action waned, it became clear that the situation was still undecided. Half of the French line on the eastern side of the lake had been cleared, but the British could not really exploit the breakthrough. A French counter-attack was in preparation.
The British gained two Morale points from the assault objective and this brought them back to “Good”. They had already been down to “Satisfactory” which would further limit their actions in the future. This is a combined measure for both the supreme leader’s and the troops’ morale. Once it remains at “Satisfactory” or “Low”, Provincials and Indians start deserting. Also, all disruption (friend and foe) is reduced by 1 at the end of each Phase. The Vassal module has button to do this automatically, so there is no need to go through stacks looking for the markers. Just don’t click it twice in a row 🙂
Injuns!
Having been strengthened by friendly Indians earlier, the French send out a patrol to harass the enemy. Behind the British lines, rattled Provincial units were recovering from the failed attacks, but there was a “hole” in the line that was exploited by 200 Indians. They used the Forced March mode to gain the required extra movement points to put two stacks of disrupted Provincials in their ZoC. This triggers the “Panic disrupted enemy” rule that can devastate its subjects. A total of four separate units have to now make a panic check!
The Indians had to go around the British Skirmish ZoC to reach their targets.
I had to roll a die for each unit separately, and the results were massively disappointing! Three attempts failed and only one resulted in a step loss and a retreat. One Bateaumen unit suffered 1 SP and pulled back three hexes. The others remain in place. This is devastating as the Indians must now engage the remaining units with their strength halved, in normal combat. I am going to go with this for now although I have considered allowing the Indians to move 16 MP by default – and suffer halving the strength. It is a change I will likely make soon, but now I just follow the current rules and data.
There is no defensive support as all British units are Disrupted and all participants are halved. With low odds, it is likely the Indians have to retreat and they will first go against the weaker stack with 5 SP New Jersey Regiment. The unit bonuses give +2 DRM for the Indians, so this could be interesting after all.
The roll is a 1 and with the DRMs 3. Odds being 2:3 the result -1D*. They lose 1 SP, retreat and become disrupted. This was a dismal failure – I expected a devastating strike against the battle-worn units. Indian losses are not recorded, so they just flip over.
I only brought some French back to the lines, because they would have to engage still-strong British troops, except where the Highlanders had breached the line. 2nd Berry stays two hexes away from the enemy and does not try to take the artillery back from the British – the chances are are quite slim.
Led by Sénezergues, the Canadians made a counter-attack with the hope of pushing the Black Watch regiment back.
With 10 SP against 7 SP, the odds are 1:1, and the British have one more bonus than the French. This proves decisive. Both sides take a one-step loss, but the Canadians have to retreat. The system is designed so that when two evenly matched forces meet, the defender has the upper hand. These are not field battles, where other factors like leadership, morale, or fatigue would weigh heavily (they do matter, but the starting point is not even).
In the next post we will see, if the British can continue their push towards the French, as they have taken significant casualties so far.
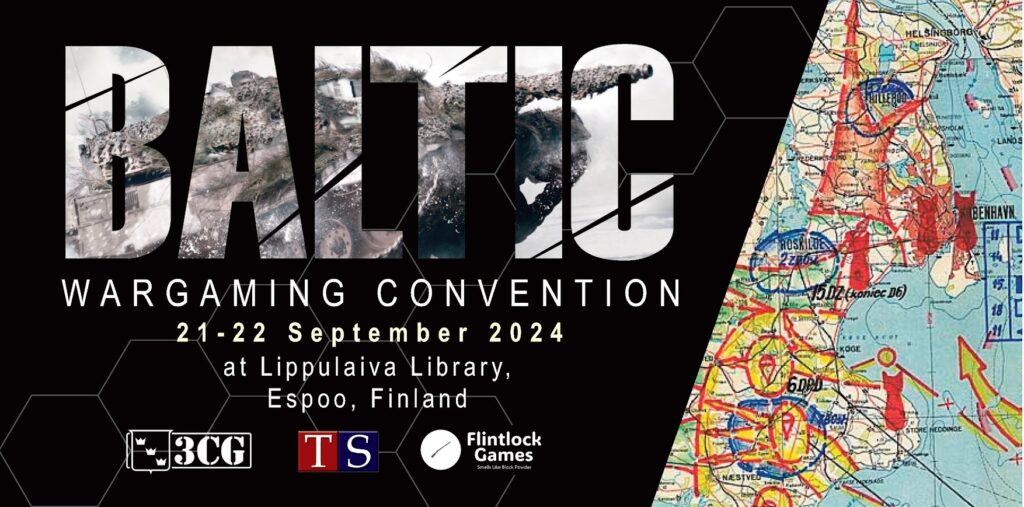
Around the summer of 2024 I had yet another idea (amongst the many other ideas), this time to start a game con around the Baltic Sea. Finland, Sweden, Poland, Denmark, Germany, etc. all have wargamers and it would be really cool to have a rotating game meeting in various countries. I had never done anything like this before and frankly, I was not well-connected with gamers, designers, retailers, or publishers in the industry. In any case, in September 2024 we had the first Baltic Wargaming Convention at a public library in Espoo, Finland. It was a zero budget effort on my behalf.
Perhaps 30 people attended, not great but not bad either! The greatest thing was to meet other gamers, and the Three Crowns Games guys, Stefan & Jan, had come all the way from Sweden to attend! My Polish team had to cancel due to a personal emergency, but we’ll try another time.
The 2024 event was described in our Finnish blog Huoltoreitti (“Supply Route”). Use the browser’s translate feature to get it in your preferred language. We were also planning a follow-up event in 2025, but things didn’t work out this time.
I was pondering my options and didn’t fancy another low-key event. It’s gotta be good, especially after visiting the Swedish Friendly Fire twice in 2025. I knew that to enjoy this most, it has to be something different and unique. I have written about my experience in Sweden: FF XVI in February and FF XVII in October (you’ll have to translate the second one, too).
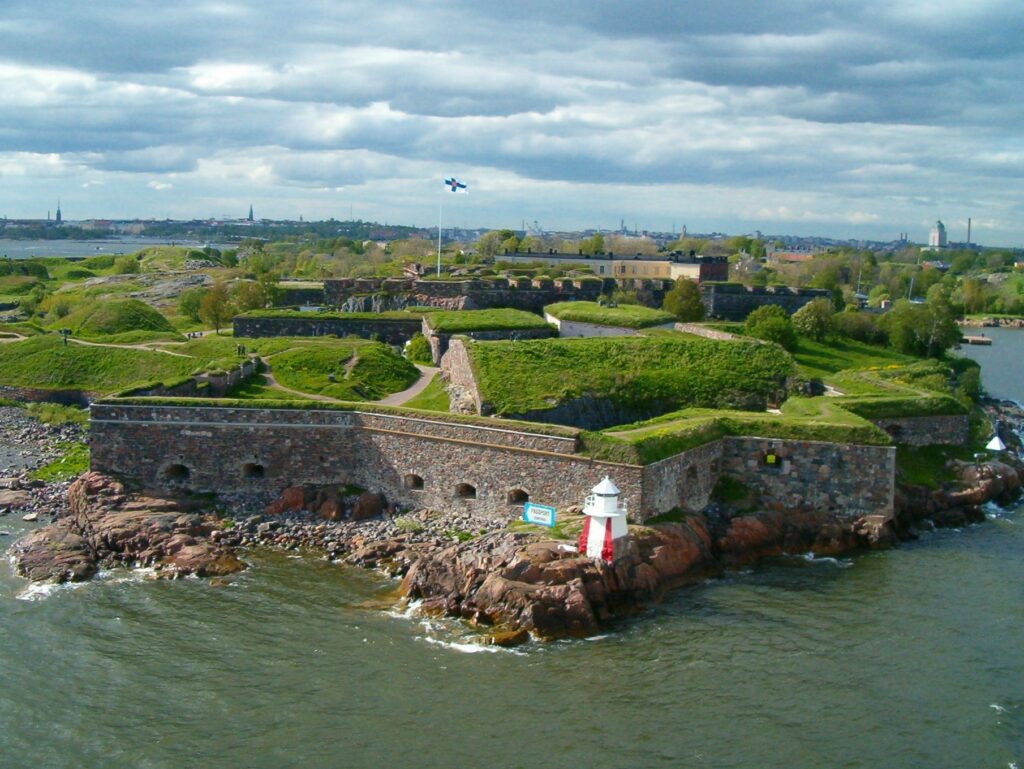
What would be the coolest place to play wargames in Finland? Sveaborg, Suomenlinna! That one gem that makes Helsinki to compete with places like Stockholm or St. Petersburg. Finland has always been the backwater of the Swedish empire, so this is not the Old Town / Gamla Stan of Stockholm (if you know what I mean). But we have the greatest fortress in all of Baltic Sea 🙂
Now all other options were off the table. I started to check out what we have available at Sveaborg and quickly realized there are no free meals. For a weekend event, everything is four-digit euros. The available spaces are really cool, though – you could, for example, rent a former powder magazine, but I ruled that out because it is a bit of a walk to get to.
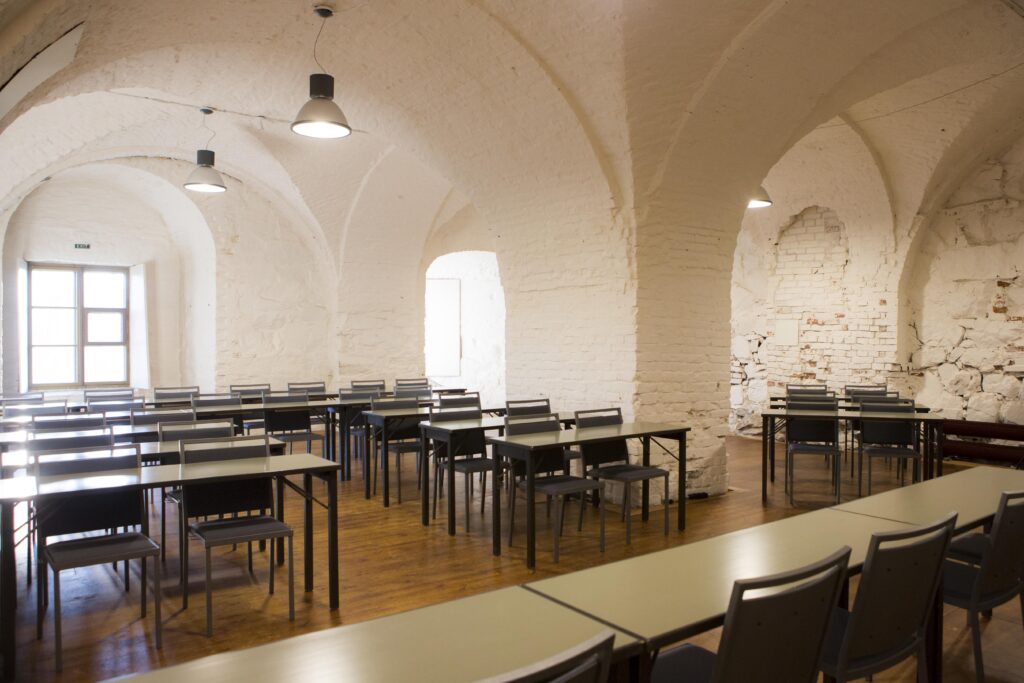
This is where Pajasali Hall comes to play. It is located a very short walk from the main pier where the Helsinki public transport ferry arrives. You have tables for more than 50 people and also a separate meeting room with a single large table – you can either play a big multiplayer game for several days or just have like 3-4 separate games going on. The only supermarket is also nearby, along with several cafes, etc. A Perfect Location.
In short: April 18 & 19 (Sat+Sun). Cool projects and their designers. A third day (Friday) will be added, if I can secure the funds.
As I am taking a short break from the Fort Carillon project before what I really hope is the final stretch, I have been testing a few game projects amongst other things.
GNWB: Napue 1714
Great Northern War Battles is a system under development. I have talked about this previously (Helsingborg 1710) – the system is quite detailed. Based on that test last February, I got interested in taking a look at using the system to model some of the battles that took place in Finland during the Great Northern War. The Battle of Napue (or Storkyro) was the final, decisive battle before Sweden pulled out of Finland and the time of terror known as the Great Wrath started. This battle was smaller than the other two scenarios in the system, Poltava and Helsingborg.
Roger, the developer of the system, took an interest as not only this would the first scenario not designed by him but also one that had a lot less moving parts and could serve as an introductory battle to learn the system. I have an interest, because it’s my country’s history and something that I have previously overlooked due to WW2 and other topics.
The opening moves. The historical scenario begins as the Russian commander, Golitsyn, wanted to take the initiative in the battle field chosen by the defending general, Armfelt.
We set up the game for the first time – I had only done some very basic testing so far. We had to iron out a handful of small issues and wrote out the first orders. The Russians tried to outflank the Swedish army which had to turn to face the threat against their left flank.
The Russians are approaching. White-blue-green small counters denote the target hexes where troops are heading.
With the system designer next to me, the game progressed smoothly. We tried to replay the historical outcome by timing the actions as we had understood from the sources available. The Swedes (or really Finns) hit the Russian left hard and broke through. Having taken heavy casualties, some Russians started to flee. Next, the Swedish army engaged the main Russian line while trying to capitalize on the stated breakthrough. It almost worked, just like in the real life. The Swedish army simply ran out of men.
The center of both armies have engaged each other.
As the cossacks ravaged the Swedish baggage train, a bloody fight took place on the fields of Napue.
Casualties are tracked in 33-man increments.
Kursk in Finland 1944 – Operation Tali-Ihantala
This is another project I have been testing recently. The Battle of Tali-Ihantala was the deciding engagement that finally convinced Stalin that the cost of beating Finland is not worth the effort. Tali and Ihantala were two small towns in Karelia, now part of Russia, and the Red Army continued its offensive after capturing Vyborg/Viipuri, the second largest city in Finland.
Eventually this will be available via Wargame Vault and published by Firefight Games.
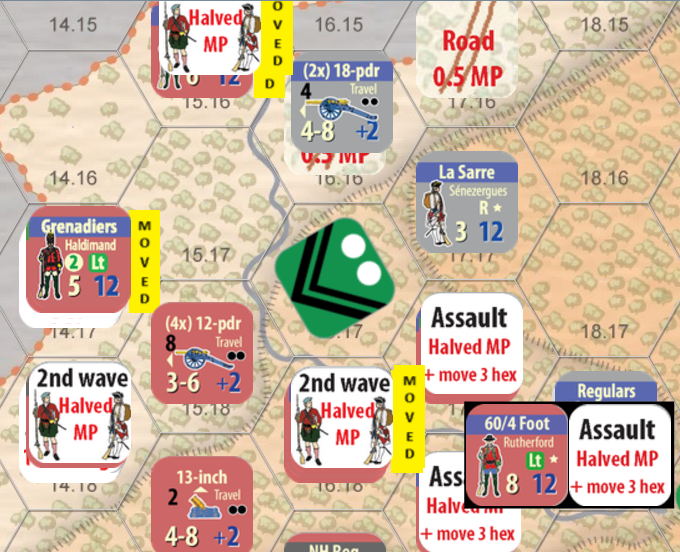
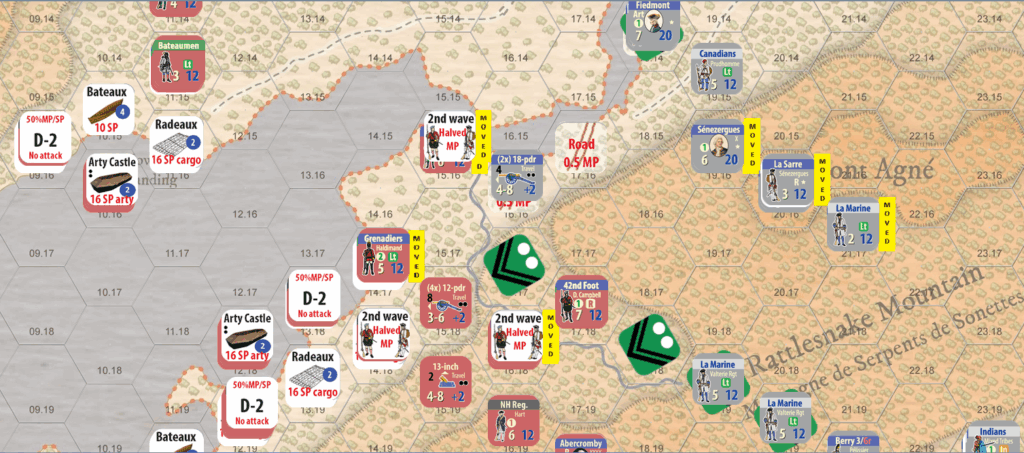
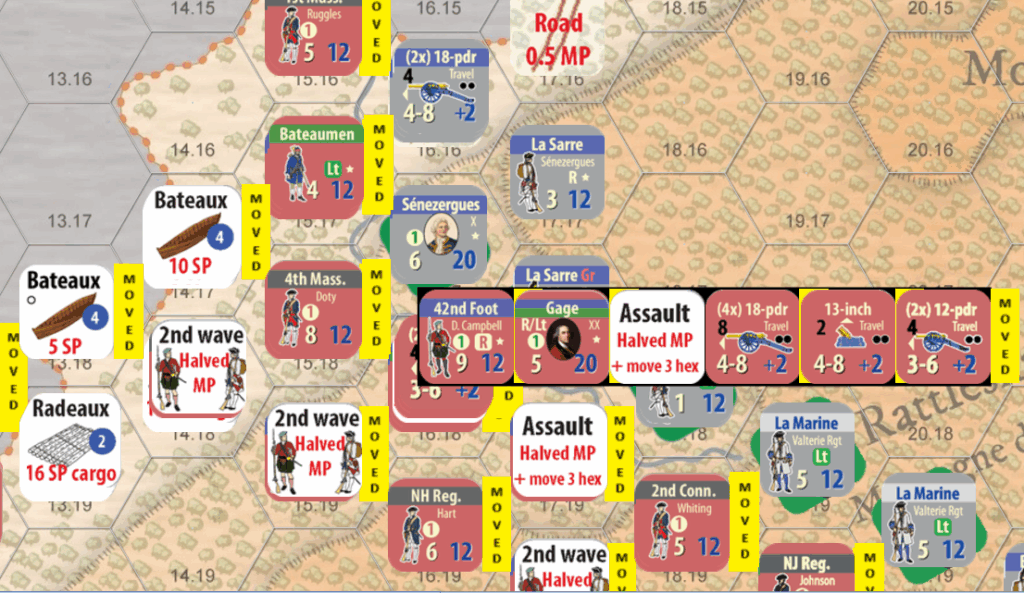
Next comes the assault. Two stacks go against a combined 3 SP strong Grenadier & Canadian defense behind a level two redoubt. The British have artillery which will fire first (technically artillery fire is resolved after all movement has been completed, but it makes no difference in this case). Six heavy guns had been brought up to bombard the French along with a single heavy 13-inch mortar. This is the main firepower of the British army in the whole area of operation. One small mistake I made was to use both of my artillery leaders with the Artillery Castles and only leave the naval commander to support unloading the artillery. This deprived me of +1 DRM bonus here…
I need to roll 3 or higher to hit the fortification with some effect. And I rolled a 3! Phew! Next roll for the impact – with the heavies only, it’s a guaranteed “hit” due to a column shift right (meaning has an effect on the target). The result is a 7 destroying the redoubt completely – big guns can be very effective! No other damage is inflicted.
Next, the massive mortar goes into action. It fires shells weighing 200 pounds, or 90 kilos!
Firing from two hexes away, it gets a -1 to hit and ends up just missing the target.
17 SP are going against 3 SP – that is a 5:1 odds. Even the redoubt would only have taken it down to 3:1. I need to resolve each stack separately using the same odds. As all assaulting troops are now regular infantry, none of them are halved. Before commencing, I have to pass the leader roll and it might be close because Gage is my leader and he isn’t that good. And he fails! There goes the better odds, but it might still work out with the two good stacks going in.
I’ll do the larger attack first. The Black Watch (9SP and +1 DRM) attack across a stream (-1 DRM) led by Gage (+1). The roll is 6 and net DRMs are +1, making it a 7. Result is a step loss, disruption and retreat for the defenders. Canadians take the loss and both units pull back three hexes. The 42nd Highlanders advance in to the hex in the middle of the enemy line and things are about to get messy here. The other stack stays put. As an assault target is captured, if they can hold on to it till the end of the phase, Morale goes up by 2.
There are three more French hexes with adjacent British units who only have troops on two hexes. The British have to either split one of their stacks to engage all three or accept the fact that one of the enemy stacks is reinforced by the adjacent French troops not involved in combat (albeit adjacent to the British/Provincials units). The latter might be a better option.
I am cautious with Bradstreet. By leaving him behind, there is a smaller possibility of losing him in combat should one of the stacks actually breach into the line. It can get bloody, especially if a weak unit breaks into a mass of enemy troops. They’ll fight till nobody is adjacent and there can be many chances of getting him killed. I don’t want to lose all my key leaders on this one day as the replacement leaders are weaker.
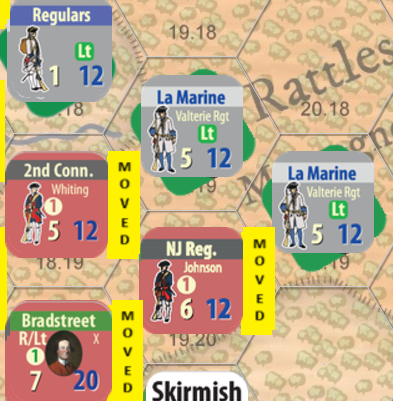
“First” attack goes in with 10 SP Provincials halved to 5 SP (due to the redoubt) against the entrenched 3 SP La Marines and Regulars. 3:2 odds drops two columns down to 2:3. There is -1 DRM for the Provincials (they both are “-1” but these are not added up, but the modifiers just remains at -1), -1 DRM for crossing the stream and +1 for Bradstreet in the background.
Roll is 6, modified down to 5. Result is -1D, actually not too bad 🙂
The last attack here has 10 SP of irregular infantry with -1 DRM attacking the dug in 5 SP La Marines supported by 3 SP from the adjacent hex (half of the SPs on that hex). Irregulars are halved against entrenchments, so ultimately we have 5 SP vs. 8 SP and one more column shift against the attacker. DRMs cancel each other out. This doesn’t look good at all.
The roll is 2 and results in a hefty -2DM*: two step losses, an Army Morale point loss and a leader loss check for Bradstreet. That roll goes bad – it’s a 2 and Bradstreet goes down! With him also goes an additional Morale point and 2 SP of Bateaumen who decide to take off and leave the battlefield (from any Bateaumen unit). It’s a hard choice to have a leader to lead an attack – their DRMs are often crucial for the outcome, but it can come with a heavy price. I removed the 2 Bateaumen (battoemen, … whatever) from those on the other side of the lake.
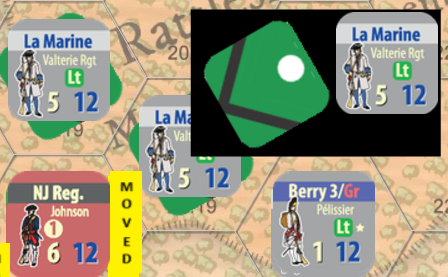
The Second Wave
After the first round of combat, I can move my reserves, i.e., the 2nd wave units. I will take some risks and attack Sénezergues and his merry band of Berry-men once more. Although there is rule for max. two attacks against a single hex, that does not include any combat that will be required once a unit has either advanced or retreated into a position where combat is required (being adjacent to the enemy).
Two regiments of regulars move into position to protect the artillery in forward positions. Although they are protected by friendly ZoC, an advance – which would be foolish – by the French could lead to losing some of the heavy guns.
Round #2
In the first round the British achieved two incursions into the French line. The one by the lake is quite interesting and the other one achieved by the Highlanders still hangs in the air – it will be a slugfest for sure. Fighting isn’t over yet and soldiers don’t just sit down once they are inside the enemy positions and start brewing tea. The British are surrounded by hundreds of French and Canadian whose only goal is to kill them all.
First those Grenadiers and Bateaumen on the shore turn their eyes on Sénezergues and his Berry Regiment. The fortification only protects from three sides – not all around. This was a design decision to balance between x lines of rules (x is not a small number) and the common historical design, as seen below. I actually had this in an early version of the rules and it got messy. You need tons of extra counters to cover various situations which might arise.
10 SP will attack uphill (-1 DRM) comprising of 6 SP of 42nd Regiment (+2) and 4 SP of Bateaumen. 4 SP defend with their leader providing a -1 to the attack. So, odds are 2:1 and no modifiers. Let’s roll the die!
Boom! A Zero!
Result is thus -1DM* – but there is no leader attacking, so we can ignore that. One step loss for the Grenadiers and a retreat plus yet another morale hit… A disappointing result, indeed.
And then I find bugs in my Vassal, again 🙁
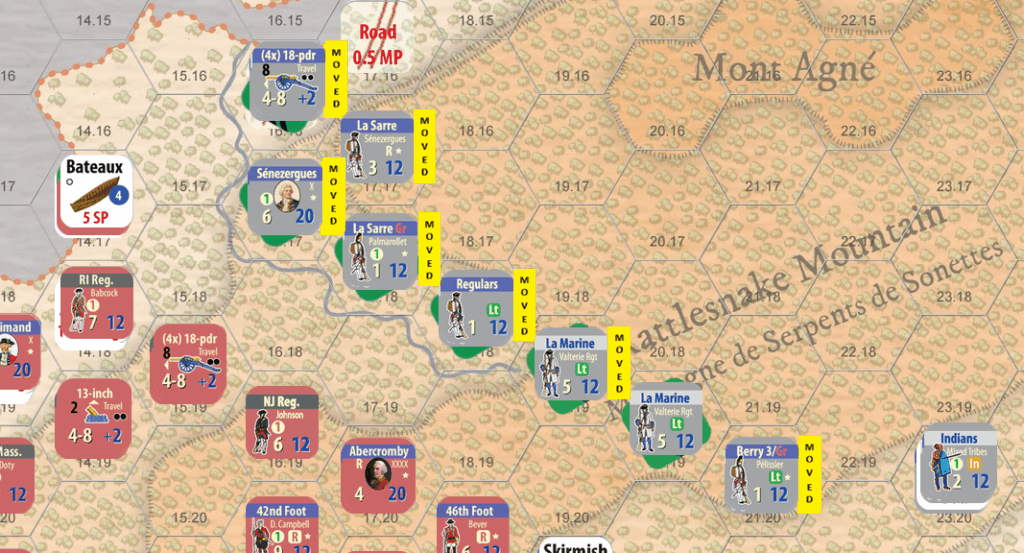
Before shutting down to rectify my counter rules in the module, I’ll finish off some combat. Campbell’s Highlanders with then-Colonel Thomas Gage (of Revolution fame) in the lead charge against the Berry: 9 SP (+1 DRM), Gage (+1) vs. 4 SP Berry and Sénezergues (-1). There are no other modifiers and the Scots are coming behind the earthworks.
The result forces the French to retreat, but no casualties are suffered by either side. They are lucky, as the backup unit behind them spares the retreating French from suffering losses from the EZoC – they are able to slip away unharmed.
I decided to not move the Highlanders into the vacated hex as I want them to now switch their attention to the other side of the French line and try to roll it up.
Before they can attack again, the 60th Regiment (4th Bn.) must go first. 8 SP vs. 3 SP, two levels of fortifications (-2 columns), +1 DRM from adjacent Gage and -1 for the stream. Final odds are 1:1 and no modifiers. I should have brought in a small unit to support them…
Roll is 2, so one step loss and disruption. The British losses keep mounting with little progress.
Now the Highlanders can go again. I removed the Assault mode marker, it plays no role anymore. 9 SP against 3 SP is 3:1. As there is a contiguous defensive line, there is no column shifts involved – this action is behind the French lines. It is also the usual +2 DRM for the British (Highlanders and Gage).
And the roll is a 1. Maybe the British should just pull back and drink their tea, and try again tomorrow. Well, they do win this one, although suffer one step loss of 2 SP (being a large unit).
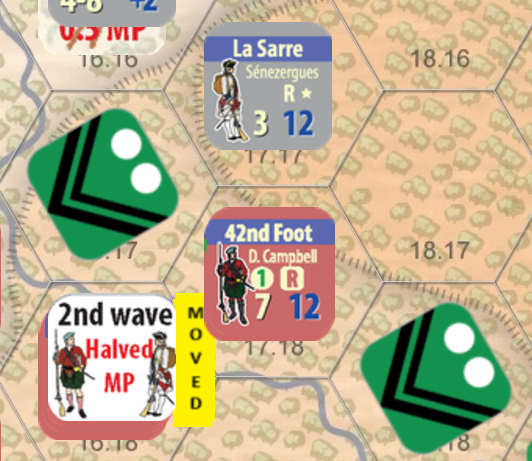
Again I decide to not advance the Highlanders into the hex. After suffering those casualties, it is better to go against the last remaining French unit in the vicinity, 3 SP La Sarre. It was Lt. Col. Étienne-Guillaume de Sénezergues’ own regiment, thus he is listed as the regimental commander on the counter. Those are for historical interest only and play no part in the game.
The odds are 2:1 with a final +1 DRM. Let’s see if the bad luck continues!
I rolled 7 with +1 it becomes 8! Not too bad! However, no casualties are taken by either side but the French have to pull back three hexes. Now this are has been cleared. The question is, will they counter-attack or start pulling back? I think we’re gonna fight, so I shall place the Highlanders accordingly. This means: stay put and don’t get cut off.
The end result of the British assault is above. Although the line was breached and the French were pushed back, I have to say this can still go either way.
As the sun rises for the big day (in this scenario), the French leaders discuss if their defenses are strong enough. They are confident the combined army of New France is able to stop and push back the red coats along with the provincial regiments crowding in front of them.
The French prepare for battle
A batch of 500 Canadian militia lands in the morning and they are sent forward to beef up the French left. They arrive just in time to see a huge number of enemy troops approaching.
Other French troops are shifted to better positions to eliminate weak spots. If the British break through, they’ll have to fight their way in to defenders’ rear. And that will not be easy and requires bringing the heavy artillery forward.
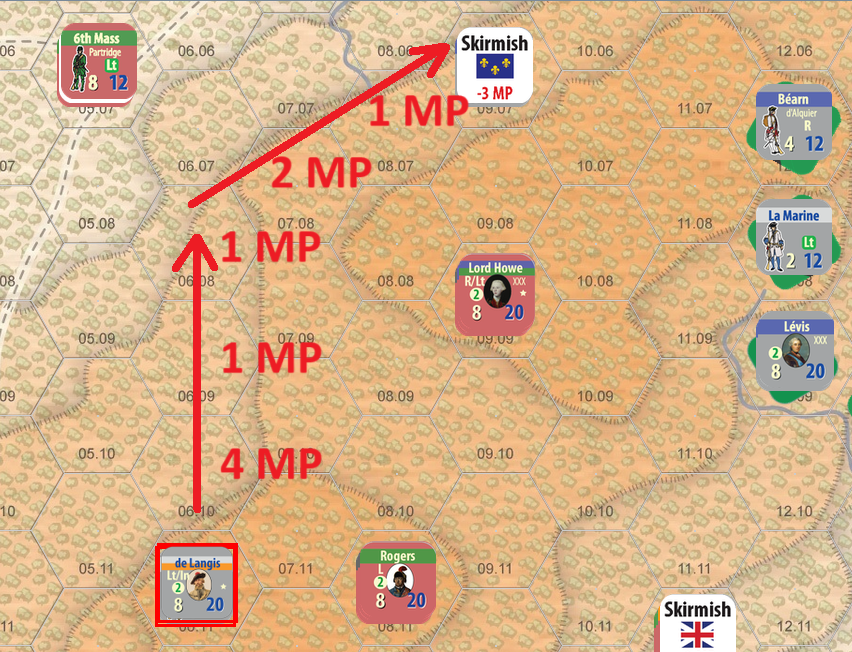
De Langis with his blocking force sneaks back through a gap left by the enemy vanguard and is able to get back to friendly forces. 12 movement points is just enough even in this tough terrain. No need to use Forced March which would lower their fighting ability. Crossing a steep slope takes time, but the rest of the journey was mostly along the side of the mountain. The distance is not great, but this is difficult terrain and I have slowed down the game over time – there was too much mobility in earlier versions.
This concludes the French Movement Action Segment and we get to the British movement next as they prepare the troops for the big day.
First, two Artillery Castles move into action one by one. As the first one nears the narrows where the French positions are located, some heavy 18-pounder cannons start blasting at this “armored” vessel. This time they miss completely by rolling a zero. Even the available modifier does not help – a zero is a zero. The British vessel continues advancing into the nook – the other French artillery remains silent as they are waiting the first vessel to continue their journey even deeper. The British artillery captain Ord decides not to push his luck and opens fire against the French fortification at point blank range.
With four howitzers and two guns onboard, they succeed gaining a hit. We still have to test for potential damage, so another roll is required. They do not miss and inflict massive damage on the earthworks destroying them completely. A shift right with the short range helped to achieve this. The artillery also takes a step loss reducing the 18-pounders to two pieces. This was a significant achievement, especially as the British ground troops hadn’t started their advance yet. A hole is opened in the French lines!
Artillery losses are not counted in the game – they just lessen the capabilities of the side suffering the loss. The second Artillery Castle also moves forward and in turn is interdicted by the two remaining heavy cannons, but without causing any damage. This time the two other batteries do not wait for a deep excursion and open fire at three hexes range even if it is beyond optimal (which for them is either one or two hexes). They score a hit forcing the vessel to retreat – no other damage was suffered.
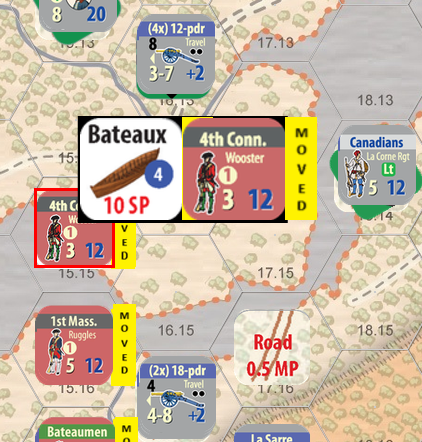
Besides moving a lot of British troops and artillery for the assault, I also try to sneak a small Provincial unit through the artillery gauntlet. It’s unlikely they’ll make it, but let’s try!
Cannons anchoring the French left take a shot and hit the bateaux. This Connecticut regiment ends up taking a step loss becoming disrupted and falls back to the departure area.
I decided to not only try to breach the hex where fortification was destroyed, but also another one in the middle of the French line – this is where the assault is now planned. I put two of the strongest British regular units into Assault Mode and moved forward pretty much half the Brutish army.
There were mostly provincials close to the shoreline, so they would have to attack separately. My regular infantry was too far away to be prepared for an assault there – after all, I hadn’t expected to be able to attempt a breakthrough there.
The British troops had been split and this complicates the planning. I had some of my best commanders on the wrong side of the lake, but I take that as they are now in reserve in case I do need to renew my attacks later. There will be heavy casualties, just like in the real battle, when going against a fortified position. I was able to move some units across the lake to enforce the British assault troops. Additionally, some heavy artillery took too long to drag over to the front to support my attacks this turn. They might be available in the afternoon if we still need them.
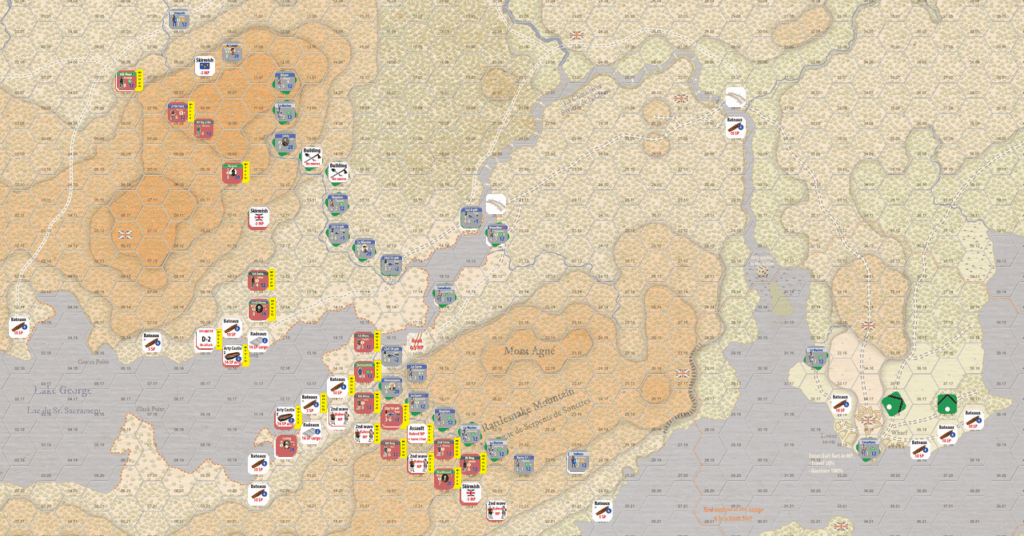
The overall battlefield with a skirmish line on the west side of Lake George (top) and a concentration of the British main army on the eastern side (bottom).
The Battle
Combat consists of one or more “rounds”. The first round is simply all combat after movement is completed – being adjacent to the enemy typically means you must attack. This is the first round. If, after all battles between the forces have been resolved, there are adjacent opposing units resulting from a) advancing or retreating after combat and/or b) reserves, i.e., the 2nd wave units, are brought into action. In this case, adjacent units must now resolve combat. Exceptions to this rule are, for instance, water between the two units (except streams, at least for now) or both sides are entrenched.
I will now start with the British left wing attacking the hex where French entrenchments were destroyed. As I am unable to use the Assault, which actually could have been useful here, I have to make two separate attacks. As most of the units there used water movement, they cannot participate in an assault.
The provincials attack first – DRMs are against them, but never know! -1 for the 1st Mass, -1 for crossing a stream, -1 for Sénezergues leading the French. They get +1 for Haldimand on the adjacent hex. The French decide to save their artillery for the other stack that has the British Grenadier battalion.
And they roll a zero… that is a “challenging” result. They take two step losses + disruption, a morale loss for the whole army, and also a leader hit check.
The British morale drops to Good. It’s not that bad really, but going down on the scale is not good news. It’s a race to the bottom and the “winner” loses.
Boom! Haldimand does not pass the leader hit check and is dead. There goes a bonus I was planning to use in the next attack.
Now the French fire their guns against the stronger British stack. Target is of course Grenadiers. Fiedmont – the French artillery officer provides +1 DRM. It’s an 8, modified to 9 – a definite hit. But they only roll a 2 and basically do not hit enough enemies to make a difference.
Another attack follows by the British Grenadiers supported by Bateaumen. No leader support is available as we lost Haldimand, but adding up the DRMs they all cancel each other out. +2 for Grenadiers against -1 for stream and -1 for busybody Sénezergues.
The odds are 2:1 and the roll was an 8 (not too bad, really!). No casualties on either side, but the French have to retreat and their cannons are captured by the British.
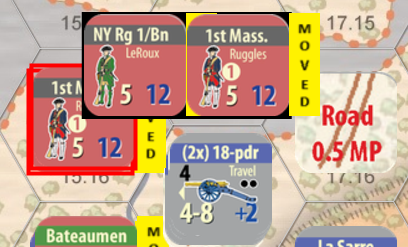
My sacrificial lamb is the 4th Mass who has to attack the well-entrenched Berry Regiment’s 2nd Battalion so they cannot support any of the surrounding engagements. The Mass troops have to attack across the stream, uphill, against a redoubt led by one of the best commanders in the French army. The raw odds are 2:1 but there will be three column shifts against… final odds are 2:3 and DRMs are -3. Looking bad!
Rolled a 3. With -3 it becomes a zero and we get yet another -2DM* result. Two step losses, a morale loss and a leader loss check. The brave Massachusetts regiment loses half of its strength (both of their step losses were actually 2 SPs),
I will have to continue this in the next post – soon!


.jpg)