
Moving to the second phase, afternoon, the French decide to take no aggressive action. The British have split their forces and this could be a golden opportunity to hit them hard. However, looking at the strong enemy forces facing the French, perhaps it is just better to wait behind the earthworks and see what the enemy plan is. The French only strengthen their patrols to delay any British advance and also enforce the two artillery batteries protecting the fort with 2 SP Canadians each.
We move now to the British Action Segment on the afternoon and its going to be a busy one. They can’t make any assaults (i.e., two stacks attacking a single hex), as those need to be preplanned in the Maintenance Segment and there hasn’t been one yet.
So, as the British, what shall we do? We had landed the main army on the bottom part of the map (east), but have quite a few irregular troops and key leaders on the opposite shore. The day is fading fast, so we won’t have a lot of combat coming up – more positioning the troops for a push in the morning. There is no point trying to force the French line before sufficient forces are available. Obviously, this scenario is very different from the historical one.
The first thing to do is to land that artillery as it will take some time to get them off the rafts* and start hauling towards the enemy. Everything is now in place, both the rafts with the artillery and the men required to unload. However, I can only commence the work during the night Action Phase which follows the afternoon.
* The players must commit troops to haul artillery around. Loading or unloading arty requires a lot of manpower. The large cannons and mortars weighted several tons each and they surely don’t just hop ashore by themselves! The “road”, i.e., the portage, was not really a road, but a soft and muddy path after the heavy rains in early summer of 1758.
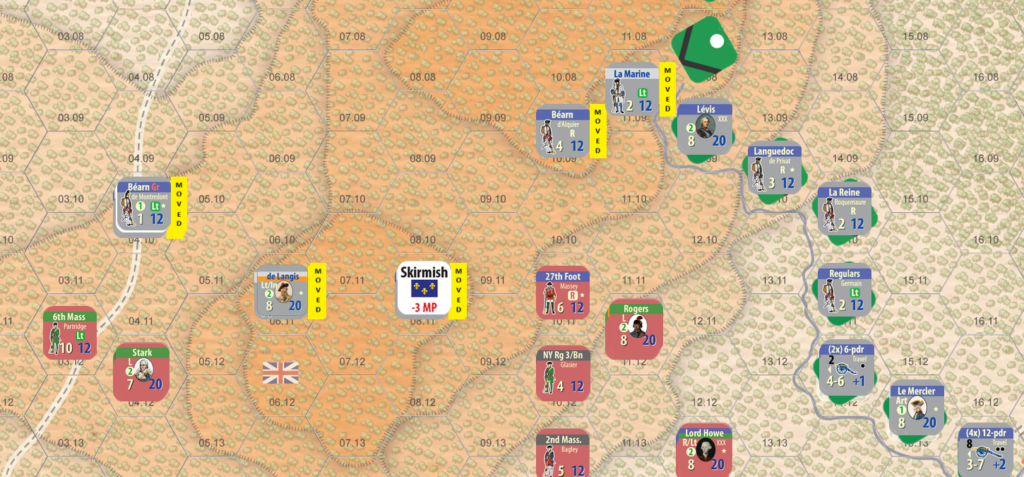
Next, I put some light infantry into Skirmish mode and engage the French skirmishers. They cannot ambush now as the two opposing skirmishers “cancel each other out” and decide to stand and fight. Covered by a ZoC I am able to move additional units there so I can hit them at least twice (which is the normal maximum of attacks per hex). More attacks can only take place if e.g., a unit must retreat next to it (and is thus mandated to attack).
The remainder of the segment is just moving the British into better positions.
The British engage the French forward patrols
We’ll have a handful of engagements in this segment – namely trying to push the French skirmishers back.
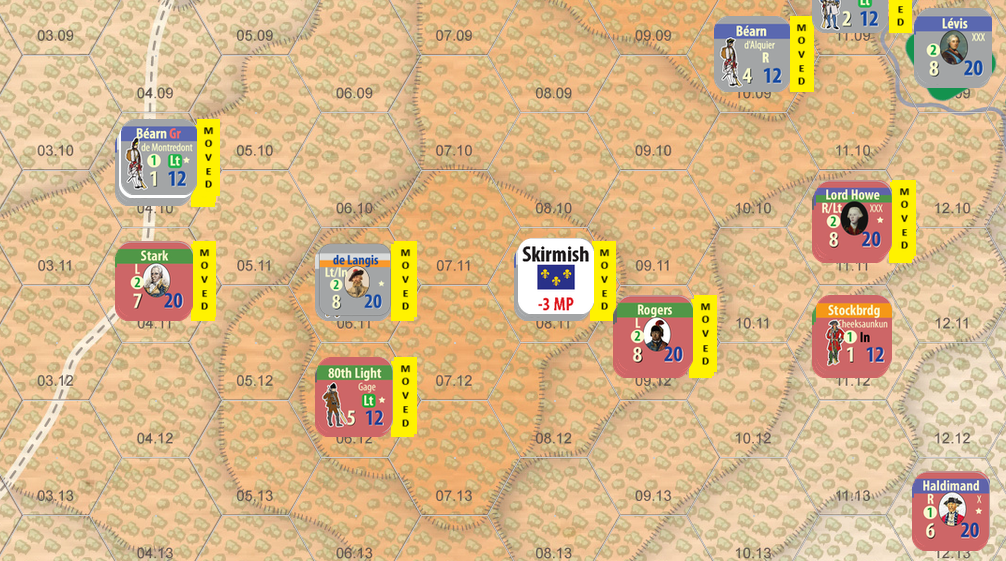
Let’s start with Stark and the 10th Mass. light regiment (10 SP – ~1000 men) on the left engaging 300 Indians and Grenadiers. Ten against three is 3:1 and Stark provides +2 DRM while the opposition has -1 DRM for this skirmish – net +1 DRM. I rolled a “5” and with the DRM, it ends up being a “NE / R” result, i.e., the attacker has no effect and the defender has to retreat (three hexes). The French group simply retreats along the path to continue being a road block.
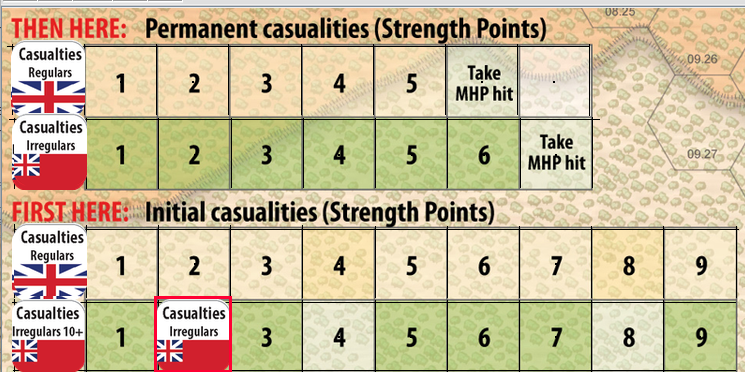
Next, we have 5 SP (-1) provincials with 5 SP 80th Light Infantry going against 4 SP Canadians, but de Langis (“Langy”) is a great leader and gives, in this situation, -2 DRM for the engagement. And it’s another “5” than turns into a “2” because of -2 DRM from the French leader and -1 from the provincials. The result is a “-1D* / NE” meaning the British units take one step loss. I will allocate this to the provincials, because there is no positive DRM provided by any unit allowing me to choose who takes it. In this case, the step loss is just 1 SP (with larger units, it can also be 2 SP). They will be Disrupted and must retreat three hexes. There was no leader on the attacker’s side, thus the asterisk is ignored (leader hit check). Once I moved the counters back, I reduced the provincial regiment by one step and added that 1 SP to the Initial casualties track (the irregulars’ initial casualties are now 2 SP). In the game, it is important to separate step losses and SPs lost – they do not go hand in hand.
Moving to the third skirmish where we have 9 SP provincials attacking uphill against 2 SP (an Indian and a regular unit). This time Rogers is leading and thus provides a significant boost to the attackers (+2 DRM), going uphill negates part of that (-1) and also the Indian unit has a bonus (+1): the net is no DRMs for either side. These provincials do not have any negative modifiers (a NY and a Mass regiment).
Now I roll a “6” and this makes it a “NE / -1” – defender loses, takes a step loss and must retreat those three hexes. 1 SP Indian unit is destroyed (they provided a positive DRM for the defender and must take the first step loss) and I’d say that is a grave loss for the French. The Indians carry more than their weight in SP – they have some special abilities.
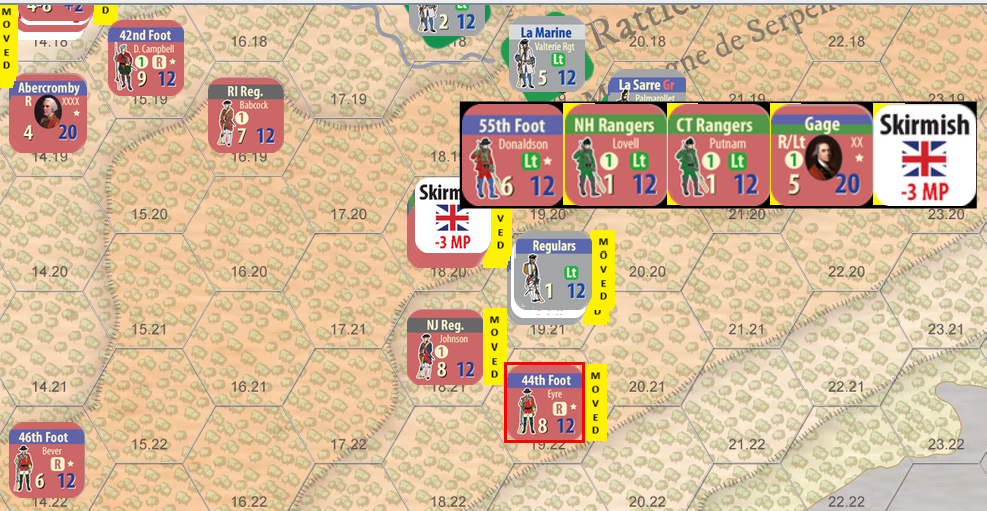
The last battle in this Action Segment is on the eastern side of the lake where I have three British stacks each at 8 SP adjacent to the French stack with 4 SP. I can make up to two attacks against a single hex, so let’s start with the NJ Regiment (-1) to soften up the defenders. Although there is no British leader stacked, Gage is on the adjacent stack and will provide a +1 DRM to negate the -1 of the provincials (leaders have a one hex radius). The French have no modifiers (the grenadiers are from the Berry Regiment which was untried and had little combat experience).
This time, I roll a “4” and with 2:1 odds it means the attack fails and the provincials lose 1 step and must retreat (and I spotted an error in my table!!!). As the NJ Regiment was a large one with 8 SP, one step loss is actually 2 SP which I will add to the Initial losses. With 4 irregular SPs lost, 1 SP is eligible to return to combat in the next Maintenance Segment.
The second attack against the same hex is by the 55th Regiment of Foot accompanied by two Ranger companies (NH and CT). The whole group is lead by Gage who goes into his 2nd attack of the afternoon. The French have no bonuses and the British get a +1 DRM from Gage. The odds are the same 2:1. Attacking downhill has no effect one way or the other.
I roll a “4” (all rolls within Vassal have been now between 4 and 6!). Add +1 DRM and it is a “5” – although the Rangers do have a bonus, they are not at least 50% of the SPs attacking and thus do not carry enough weight in the battle.
The result forces the French to retreat. The victorious British advance one hex.
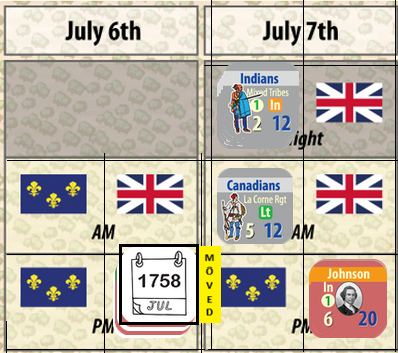
One thing I apparently forgot is to bring back the units that had retreated off-map earlier. As I write this in small chunks I overlook a thing or two (I am on vacation!). I’ll fix that now and land those troops along the shores. This basically concludes the daylight segments of the first day and night will follow with the subsequent Maintenance Segment.
I will continue the game in the next post in about a week or so.
Discover more from Flintlock Games
Subscribe to get the latest posts sent to your email.