
In this series of posts I will walkthrough several turns of the game play step by step using the rudimentary Vassal module I have been working on for the past several months. This will hopefully help players get acquainted with the mechanics of the 1758 Fort Carillon game. The module and art used are very much work in progress and are visibly incorrect in many ways. I will try to highlight those as I go through the game.
There will be inconsistencies in and between various images – this is a living project where many details are still being adjusted.
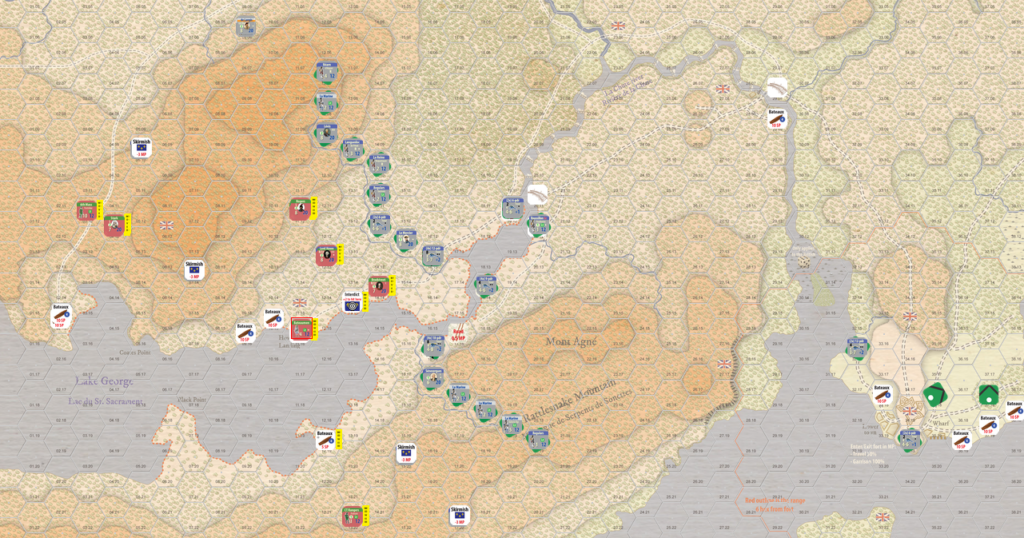
The starting setup in the “Montcalm’s Plan” scenario. The French are deployed into a defensive line with artillery close to the lake on both shores. Most units are also entrenched.
French setup
The French player has 40 build points that can be used to prepare defenses on the map. I have prepared a version that has a setup for an easy play. It can also be altered, if the players so agree. However, the 40 points are the cap and all constructions must be within that limit. I will not make any changes here and just go ahead with my saved scenario.
Part of the setup is the random French reinforcements. As “Montcalm’s Plan” covers the release of various troops to defend Carillon sooner than historically, let’s see when the remainder of those forces will arrive based on some die rolls.
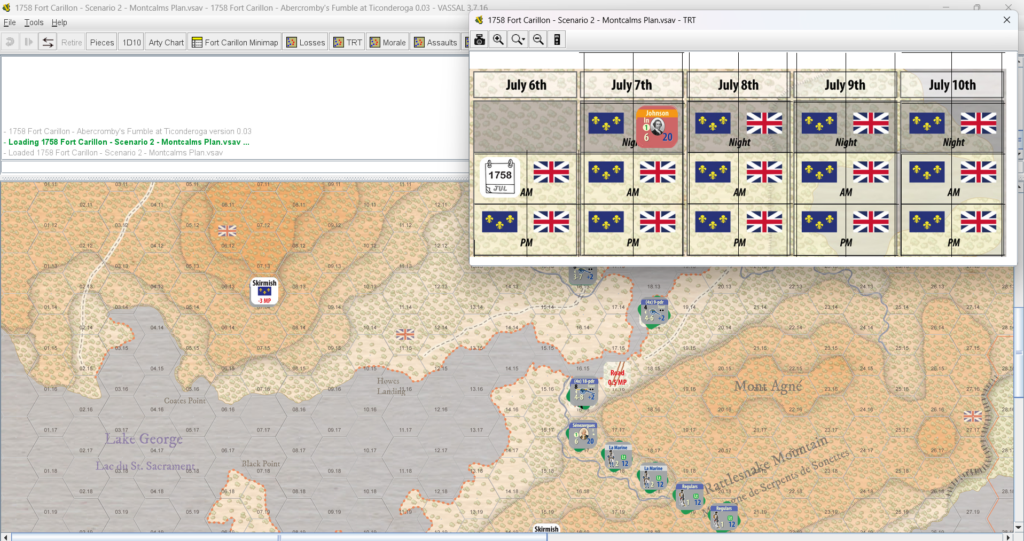
The table for random French reinforcements.
I rolled five times: 5, 7, 5, 5, and 8. So, the troops will arrive by bateaux as follows:
- 5 SP La Marine starts on the map (SP = Strength Point, approx. 100 men)
- 5 SP La Marine will arrive on July 6 night
- 5 SP Canadians on July 7 morning
- 5 SP Canadians on July 6 night
- 2 SP Indians and 5 SP Canadians on July 6 night
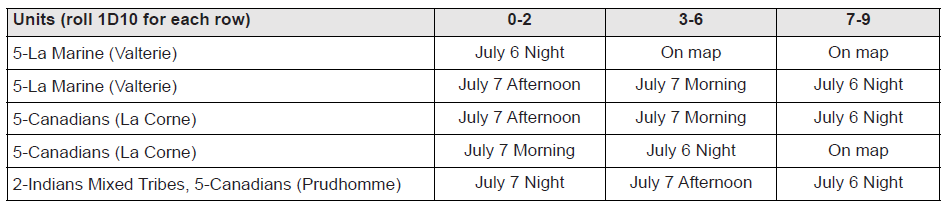
Next, I will find and place those units on the TRT (Turn Record Tracker) or as I still tend to call it, the Date and Time Track. As I received a strong 5 SP La Marine unit directly on the map, I decided to beef up my southern flank to discourage any British incursion there. This freed up some smaller 1 SP units from the entrenchments that I placed forward to support the skirmish line.
500 marines had arrived in time to join the troops on the French left flank. (The arrival of Johnson’s Indians is incorrect here.)
“July 6th night” is still on my version of the map under July 7. That will be corrected in the future – the Night Action Segment will move to the end of the previous day. A Maintenance Phase will also be added – it’s already visible in the squares covering the dates. I have not requested updates to the art for quite some time and try to fix most of them in one go.

The French reinforcements are now placed as per the die rolls earlier. Valterie/Valtrie, La Corne, and Prudhomme are just historical chrome and do not affect the game. These counters are interchangeable.
The remaining French artillery is left in the fort along with some irregulars.

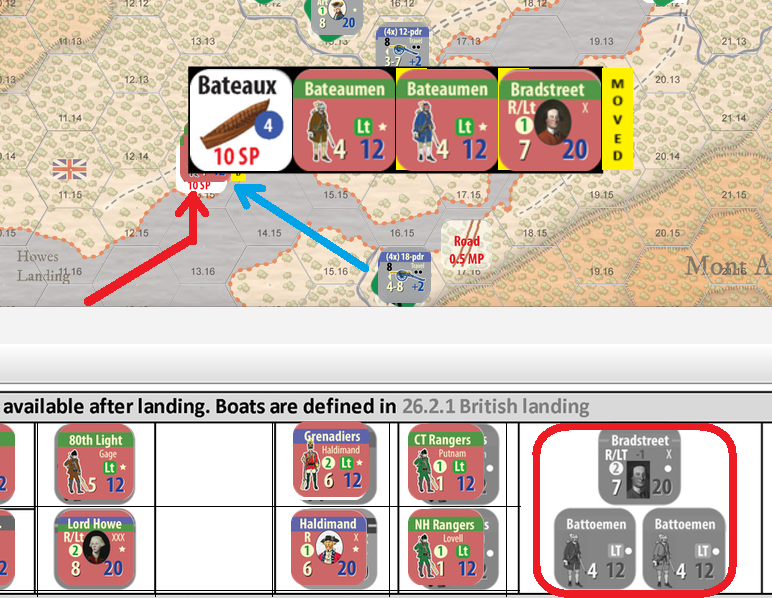
At the north end of Lake George, French artillery protects the pontoon bridge. Not a bad idea, as Bradstreet’s bateaumen actually landed just short of the bridge.
The British Landing Commences (July 6th, Morning)
As I make no French movements on the first turn, I will now begin the British landing. It is divided into three separate waves; the first two take place on the July 6 Morning Action Segment. The third can only take place on the Afternoon Action Segment (or later) – this is when the artillery and supplies start to land. After adjusting the TRT, I will open the British Landing Box window and start with the light troops spearheading the main army. Yes, this screen is messy too, but I’ll get it sorted out.
To support the main army, two floating Artillery Castles are available. They may attempt to suppress some of the French artillery or bombard the earthworks.
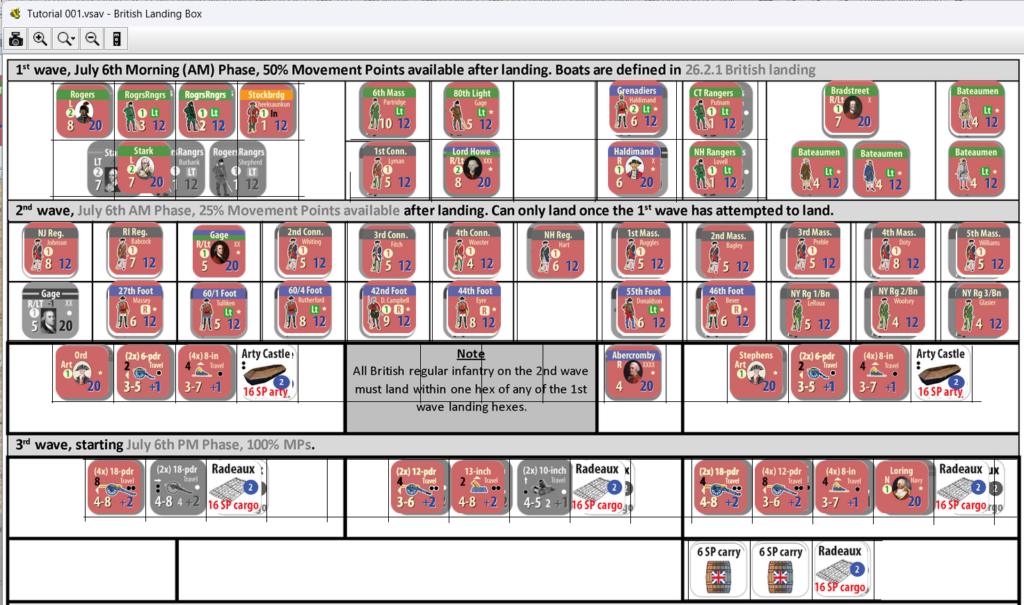
The first wave with the Grenadiers, Rangers and other light troops are the vanguard of the vast British army. (While this view requires lots of cleaning up, it is good enough for now.)
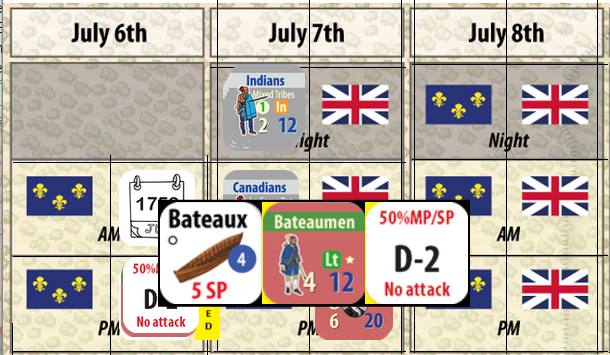
The French Artillery Interdicts
Bradstreet and 800 of his bateaumen are the first to attempt landing. They come in medium range of the French heavy artillery on the opposite side of the lake. An interdiction attempt will take place next.
One of the Bateaumen units is targeted (bateaumen, bateauxmen, battoemen… take your pick! Eventually, I’ll settle with a single term).
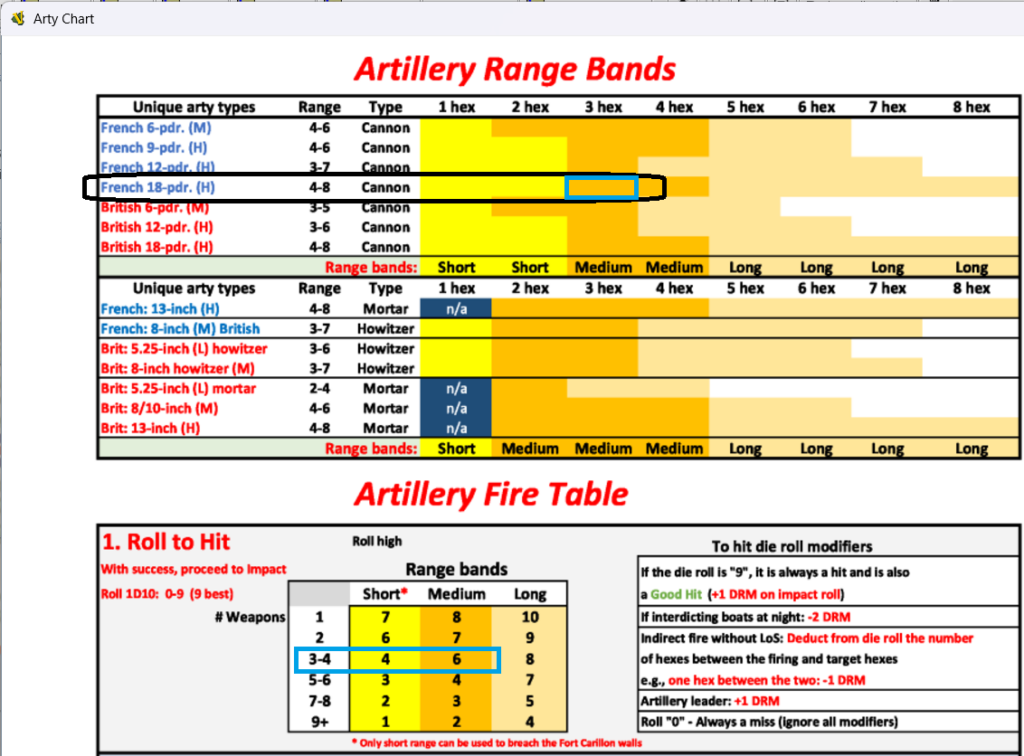
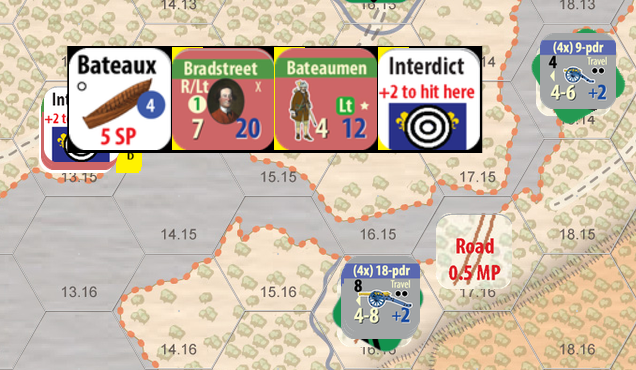
In the Artillery Chart below, we identify the type(s) of artillery first (here only French 18-pdrs) and check the distance: it is three hexes and thus uses the medium range band (orange) which I specifically highlighted with a blue quadrangle. The French also have an artillery leader giving a positive DRM (die roll modifier) for the to hit roll. Should multiple different types of artillery try to fire together, they all must be – in this case – direct-fire capable and also share the same range band (“effectiveness”). They could have a different range, but must be adjacent to each other and also have an artillery leader in range to fire together.
Die roll is “6”, and +1 for the leader DRM, thus the final roll is “7”. Looking at the medium range band for 3-4 pieces on the second table (Artillery Fire Table), it requires at least a “6” to hit (which we have here).
Good, then we’ll roll another time, for any damage. This can also fail completely with a bad roll, but as we have only heavy 18-pound naval cannons firing, we get a column shift right for impact – which is pretty good, because we cannot get a “No effect” on the target. A “No effect” is when you’d score some hits, but not enough to have a real impact within the scale of the game.
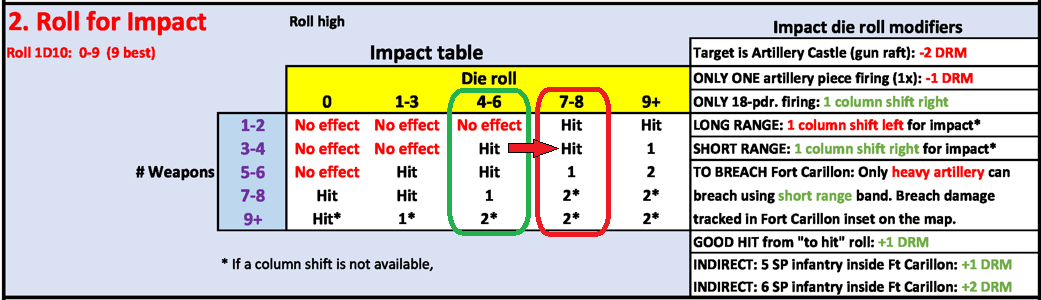
The roll is a “4”, and even with the column shift right modifier, the end result is the same on both columns – a “hit”. On the Allocate hits section, we choose the Soft target column, as only fortifications are a Hard target. A “Hit” states that the target unit is disrupted and must retreat as they were on water.
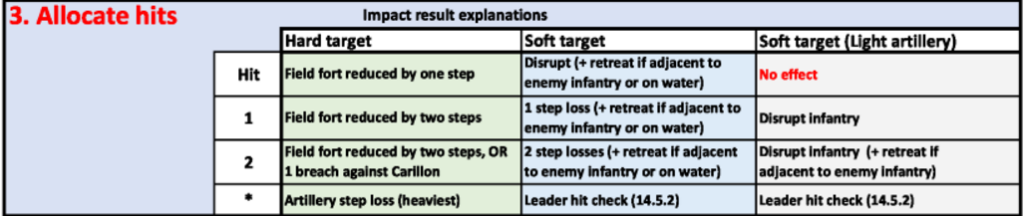
The whole stack is not forced to retreat, only the affected unit. It will not go back to the British Landing Track, but instead, it will be placed on the TRT, to the next British Phase (afternoon). It would normally be marked with a Disrupted (D-2) marker, but as they would have recovered by the time they can re-enter the map, this is not really needed. Recovery from disruption is automatic and will always be reduced by one step at the end of both player’s Action Segment. This is to ensure the unit remains disrupted through one enemy Action Segment – in this case, the unit will miss this segment anyway.
I also split the 10 SP bateaux into two smaller 5 SP counters.
Finally, I place an Interdict marker on the hex, where the British were hit. For any subsequent British attempts, the chances to hit are increased during this morning phase (+2 to hit on the same hex, +1 on all six surrounding hexes). The gunners have now ranged their guns. These will be removed during the Maintenance Phase, because I wanted not to think about artillery being relocated etc. That would have complicated the rules too much.
The remaining 4 SP Bateaumen and Bradstreet are allowed to continue their landing unaffected (they could also have retreated with the other unit).
The 9-pounders seen below cannot interdict as there is land between the water hexes blocking their Line of Sight.
Once landed, the troops have half of their MPs left (6 MP), but they move only one more hex. I will land the remaining British further away to avoid the powerful artillery.
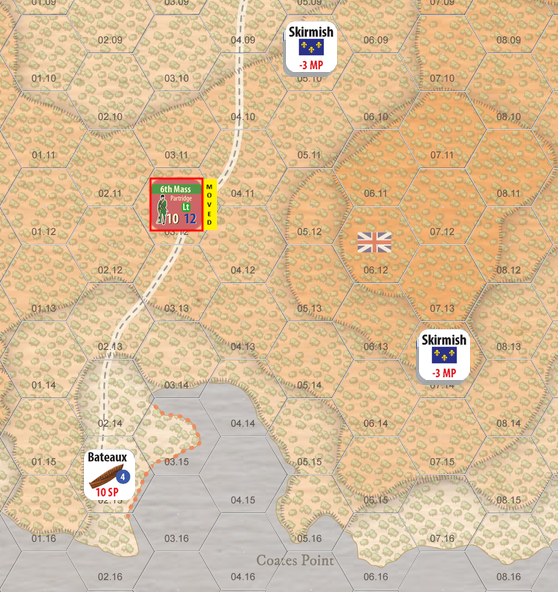
The Vanguard Lands
As the next unit to land, I chose the 10 SP strong 6th Massachusetts light infantry regiment. Units cannot use any other mode except normal movement after landing, thus I don’t want them to run blindly against the enemy and keep a distance to the lurking French patrols in Skirmish mode. Had the 6th Mass. moved any closer, it either would have been subject to an ambush or allow any Skirmish mode units to retreat to a more favorable position.
I’ll just go ahead and land more troops.
Below is where I landed my vanguard. The second phase troops, which are the main army, must land within one hex of these landing hexes. “No sane commander would blindly land his army without any reconnaissance,” right?
The Main Army lands
This being a game allows me to explore how different decisions could have affected the outcome. Finding a strong line of defense facing the planned landing area changed, I made the decision to go for the opposite, eastern shore of the lake. Let’s see how this plays out!
There was only one small unit that had come to the shore as part of the first wave, but that should be enough. And if it is not, this operation will fall apart!
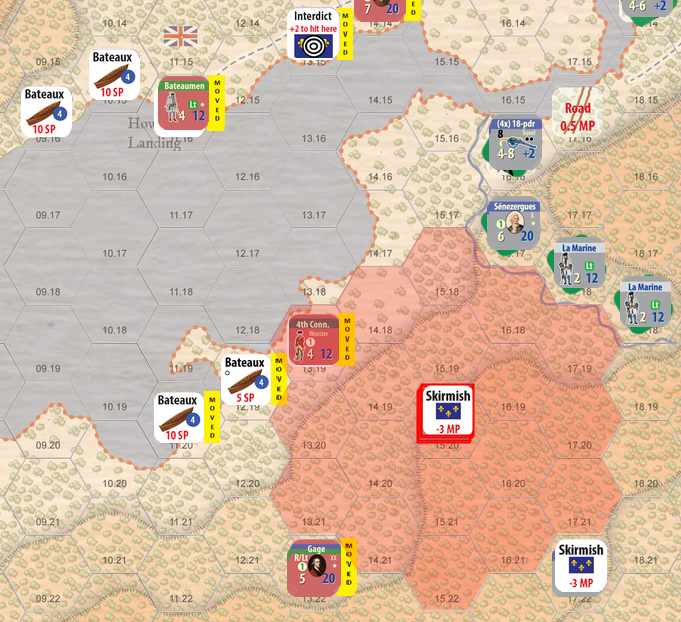
To expand the landing area and accommodate more troops, I had to land on Skirmish ZoC of the French (red shaded area).
My 4th Connecticut Regiment landed on a hex within the defender’s Skirmish ZoC enabling them to attempt an ambush. Let’s see what happens…
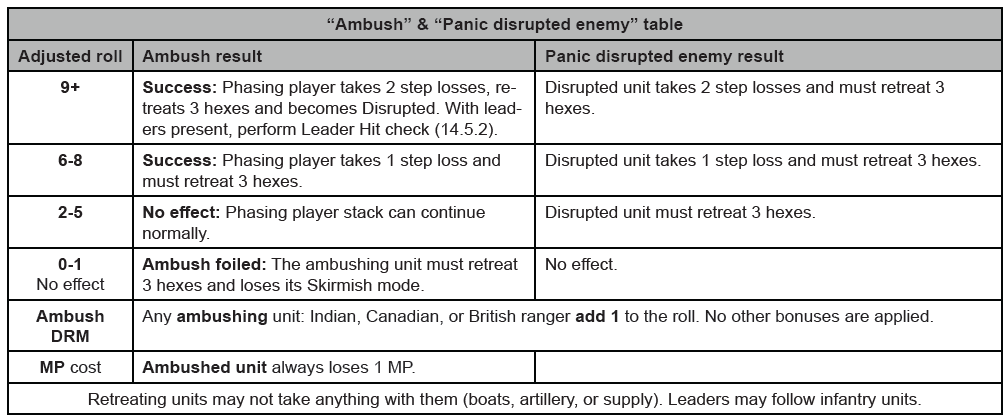
I rolled “8” – the target takes a step loss and has to retreat. As they arrived by boat, they have to retreat by boat into the TRT, the next friendly Phase (afternoon).
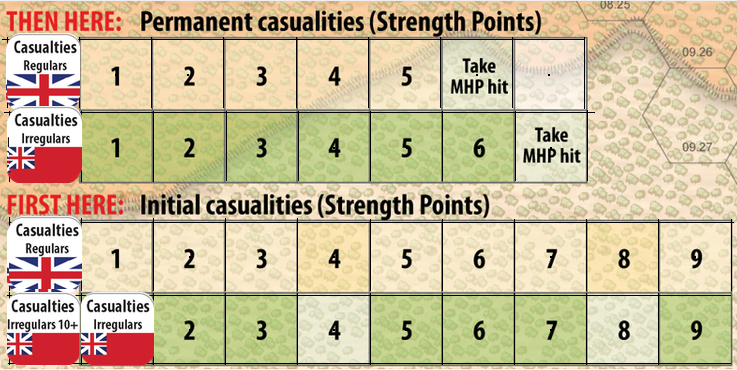
Infantry casualties are tracked in two different ways, first they go to either regular or irregular Initial Casualties Track and after four SP losses of the same type, one SP can return as replacements, while the three remaining will go the Permanent Casualties Track. After a certain amount of permanent casualties, Morale takes a hit.
As this post is getting quite long, I have decided to publish whatever I have so far and continue the turn in a future post – hopefully within a week or so. I will also be fixing the language, spelling errors etc. over time.
Discover more from Flintlock Games
Subscribe to get the latest posts sent to your email.